
Main Courses
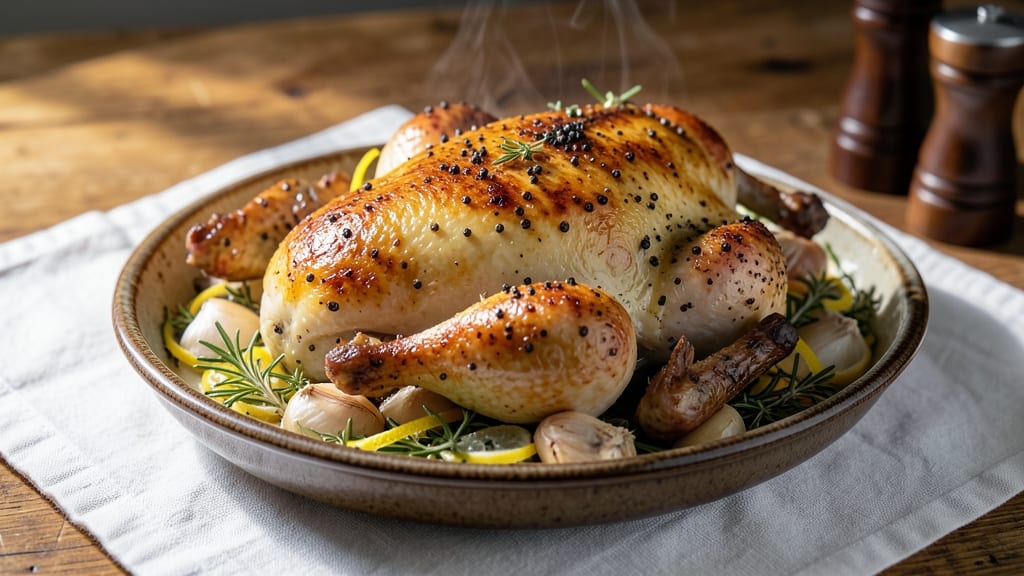
This baked lemon pepper whole chicken recipe delivers crispy skin from edge to edge while keeping the meat juicy and tender throughout. The secret lies in a precise balance of lemon zest, black pepper, and herbs that create a fragrant crust while protecting the meat from drying out.
I've perfected this method after years of testing—no more dry chicken or uneven browning.
The process starts with a simple yet critical step: applying the lemon-pepper seasoning both under and on top of the skin before baking. This dual application ensures maximum flavor penetration while creating that coveted crispy texture. A high-heat start followed by a lower-temperature finish guarantees even cooking without sacrificing moisture.
What you'll end up with is a whole chicken that's golden-brown and crackling on the outside, with meat so tender it pulls apart effortlessly. The lemon-pepper crust adds a bright, aromatic finish that pairs perfectly with roasted vegetables or garlic mashed potatoes.
This is the kind of centerpiece that makes every dinner feel special.
The best part? This recipe requires minimal hands-on time—just 30 minutes of prep followed by 1 hour 45 minutes in the oven. The result is worth every minute, delivering restaurant-quality flavor and texture without the fuss. Let's get started on creating your perfect roasted chicken.
Ingredients for baked lemon pepper whole chicken
Eleven ingredients for restaurant-quality crispy skin and juicy meat every time.
| Ingredient | Amount | Notes |
|---|---|---|
| Whole Chicken 🍗 | 4 lb | Fresh, thawed if frozen |
| Lemon Zest 🍋 | 2 tbsp | From 1 large organic lemon |
| Black Peppercorns 🌶️ | 2 tbsp | Freshly cracked coarse grind |
| Fresh Rosemary 🌿 | ¼ cup | Finely chopped, stems removed |
| Fresh Thyme 🌿 | 1 tbsp | Leaves only, finely chopped |
| Garlic Cloves 🧄 | 4 cloves | Minced, for under the skin |
| Olive Oil 🫒 | ¼ cup | Extra-virgin, for basting |
| Salt 🧂 | 1 ½ tsp | Diamond Crystal kosher salt |
| Unsalted Butter 🧈 | 2 tbsp | Melted, for under the skin |
| Fresh Lemon Juice 🍋 | 2 tbsp | From same lemon as zest |
| All-Purpose Flour 🌾 | 1 tbsp | For patting dry chicken |
The chicken is the star—opt for a 4-pound fresh bird with even fat distribution for consistent crispiness. Local butchers often carry superior quality, but grocery store brands like Bell & Evans or Perdue work perfectly. Look for vibrant skin color and firm flesh; avoid any with yellowing fat or strong odors. The lemon should be organic if possible, with thick zest that peels easily—Eden Foods or Whole Foods selections are ideal. Fresh herbs are non-negotiable here; dried substitutes will compromise the aromatic balance.
No fresh rosemary? Dried at one-third the amount works, but expect muted flavor. Substitute thyme with oregano at equal measure, though the profile shifts slightly. For extra crispiness, brush the chicken with a thin layer of cornstarch slurry (1 tbsp cornstarch + 2 tbsp water) before baking. The butter under the skin can be swapped for olive oil if preferred, though butter delivers superior moisture retention. If using frozen chicken, thaw it in the fridge overnight—never in cold water as it promotes uneven cooking.
Pat the chicken thoroughly with paper towels after seasoning to remove excess moisture, which is critical for crispy skin. Store any unused zest or herbs in airtight containers in the fridge for up to 5 days. The seasoned chicken can be prepped ahead and refrigerated for 12 hours before baking, but avoid marinating longer than this to prevent over-tenderizing. Leftover cooked chicken reheats best in a 350°F oven for 20 minutes with a splash of water or broth to restore moisture.
Why You'll Love This Recipe
- Five-Ingredient Magic: I swear by this combo—just the chicken, lemon zest, peppercorns, rosemary, and thyme. No fancy marinades or last-minute shopping runs. The bright citrus and peppery kick do all the heavy lifting.
- Crispy-Juicy Balance: That golden skin with tender meat inside? It’s the lemon’s acid working with the oven’s dry heat. The rosemary and thyme infuse every bite, but the peppercorns add a little bite that keeps it interesting.
- Weeknight or Sunday Feast: Honestly, it’s my go-to for both lazy Tuesdays and hosting friends. Same recipe, different vibes—serve with roasted potatoes for a simple meal or carve it for a showstopper. No stress, just flavor.
- Leftovers That Don’t Suck: Between us, most chicken leftovers taste like sad, dry paper. Not this one. The lemon keeps it moist, and the herbs make shredding it for salads or wraps feel like a treat, not a chore. (Yes, even on a Wednesday.)
Step-by-step instructions for baked lemon pepper whole chicken
Master the art of achieving crispy skin and juicy meat with this precise technique.
Prep the Chicken for Maximum Crisp
Remove the whole chicken from the refrigerator and let it sit at room temperature for 30 minutes to ensure even cooking. Pat the chicken thoroughly dry inside and out using paper towels—this is critical for developing crispy skin. I press firmly along the cavity and under the wings where moisture tends to accumulate.
Next, season the cavity generously with 1.5 teaspoons of salt and 1 tablespoon of fresh thyme leaves. This internal seasoning infuses flavor throughout the meat. For the exterior, create a lemon-pepper paste by combining 2 tablespoons of lemon zest, 2 tablespoons of freshly cracked black peppercorns, and 1 tablespoon of all-purpose flour in a small bowl. Rub this mixture all over the chicken, including the legs and wings.
Create the Flavorful Under-Skin Rub
Using a sharp knife, carefully loosen the skin over the chicken breast and thighs by sliding the blade between the skin and meat. This creates a pocket where we'll place our flavorful filling. In a small bowl, mix 2 tablespoons of melted unsalted butter, 4 minced garlic cloves, and 2 tablespoons of fresh lemon juice. Spoon this mixture under the skin, spreading it evenly.
For the exterior, combine ¼ cup of finely chopped fresh rosemary and ¼ cup of extra-virgin olive oil in a small bowl. Rub this mixture all over the chicken, pressing firmly to ensure it adheres. The rosemary will infuse aromatic depth while the olive oil promotes browning. Let the chicken rest for 15 minutes at room temperature before baking—this allows the flavors to penetrate the meat.
Roast at High Heat for Crispy Skin
Preheat your oven to 425°F with the rack positioned in the lower-middle position. Place the chicken on a wire rack set inside a rimmed baking sheet—this allows hot air to circulate underneath for even browning. Roast for 20 minutes, then reduce the oven temperature to 375°F and continue baking for an additional 45-55 minutes, or until the internal temperature reaches 165°F when measured in the thickest part of the thigh.
Here's the key: During the final 15 minutes of cooking, increase the oven temperature to 425°F again to create a crispy skin. You'll know it's ready when the skin is deep golden brown and crispy to the touch, and the juices run clear when you pierce the thickest part of the thigh with a meat thermometer. The high initial heat jump ensures that final crisp without drying out the meat.
Rest and Serve for Juicy Perfection
Transfer the chicken to a cutting board and tent loosely with aluminum foil. Let it rest for 15-20 minutes before carving. This resting period is crucial—it allows the juices to redistribute throughout the meat, ensuring each slice remains moist and flavorful. I always use this time to prepare my sides or make a quick pan sauce from the drippings.
To serve, carve the chicken into serving pieces, basting any accumulated juices from the baking sheet over the top. The result should be a chicken with crispy, golden skin that shatters slightly when pressed, and juicy, tender meat infused with bright lemon and aromatic herbs. Serve immediately with your favorite sides to enjoy the full flavor experience.
Pro Tips For Making Baked Lemon Pepper Whole Chicken
- CRANK THE OVEN HIGH FIRST: Start your chicken at 450°F (230°C) for the first 20 minutes—this sears the skin and locks in juices before you lower the heat. After burning two chickens by skipping this, I now swear by the crispy skin it guarantees. Just don’t walk away; check it at 15 minutes or the skin’ll turn to leather.
- ZEST THE LEMON RIGHT: Use a microplane for the lemon zest—not a grater—and take it from the outer yellow layer only. The bitter white pith makes the whole dish taste soapy, and I learned that after serving a plate where someone picked out every bite. Also, zest 2 lemons: the flavor fades fast in baking.
- SALT THE CHICKEN INSIDE: Tuck a teaspoon of kosher salt into the cavity along with the herbs—it seasons the meat from the inside out. I used to skip this, thinking the skin salt was enough, but the thighs always tasted bland. Bonus: add a halved lemon in there too while it bakes.
- STOP AT 165°F: Pull the chicken out when the thickest part of the thigh hits 165°F—waiting for 175°F dries it out. I used to rely on time (45-60 minutes) and ended up with dry meat. A meat thermometer is worth its weight in juicy chicken, especially with this bright, citrusy seasoning that masks overcooking.
Wine and beer pairings for these flavors
White Wine Pairings
For this bright lemon-pepper chicken, I recommend a crisp Sauvignon Blanc from New Zealand or Loire Valley—think Cloudy Bay or Sancerre. The wine's zesty acidity and citrus notes mirror the lemon in your dish, while its mineral finish cuts through the richness of the crispy skin.
Serve it slightly chilled (45-50°F) to preserve its vibrant flavors. 🍷
Light Red Options
A light-bodied red like Pinot Noir from Oregon or Burgundy works surprisingly well with this chicken. Look for wines with bright acidity and red fruit notes, such as Domaine Serene or Louis Latour.
The wine's subtle earthiness complements the rosemary and black pepper without overpowering the lemon's brightness. Decant for 30 minutes before serving to soften any tannins.
Beer Pairings
For beer lovers, a Belgian Witbier like Hoegaarden or Stella Artois is perfect—its coriander and citrus notes enhance the lemon-pepper profile. Alternatively, a pilsner from Germany or Czech Republic, such as Pilsner Urquell, offers a clean, crisp backdrop that lets the chicken shine.
Serve both beers well-chilled (40-45°F) to highlight their refreshing qualities.
Non-Alcoholic Options
Don't overlook sparkling beverages! A sparkling lemonade made with San Pellegrino Limonata or a homemade mix of fresh lemon juice, sparkling water, and a touch of honey pairs beautifully.
For a herbal twist, try sparkling hibiscus tea—its tartness and floral notes complement the rosemary and thyme in the chicken. Serve over ice for a refreshing contrast to the warm, crispy dish. 💧
Wine and Beer Serving Tips
Always serve wine or beer slightly chilled to preserve their crispness and acidity. For wine, use a wine cooler or ice bucket with a towel draped over it to prevent over-chilling. For beer, I recommend a beer stone in the freezer—pop it into your glass for 10 minutes before pouring.
This keeps the drink cold without diluting it. Pairing the right beverage elevates the meal from delicious to unforgettable! ✨
Nutrition facts
Frequently asked questions
Can I use this recipe with frozen chicken?
Fresh chicken works best for optimal crispiness, but if using frozen, thaw it completely in the refrigerator for 24 hours first. Never thaw at room temperature—this creates uneven cooking and safety risks. Pat the thawed chicken completely dry before seasoning to ensure the same crispy skin results.
How do I adjust the cooking time for a different chicken size?
For every pound less than 4 lbs, reduce cooking time by 10-15 minutes. For larger birds (5 lbs+), add 15-20 minutes to the total time. Always check the internal temperature at the thickest part of the thigh—it should reach 165°F for safe consumption. The final 15-minute high-heat crisp works for all sizes.
Why did my chicken skin turn white instead of crispy brown?
This usually happens when moisture remains on the skin or the oven isn't hot enough. Double-check your prep: pat the chicken completely dry and ensure your oven reaches 425°F before inserting. For extra insurance, broil for 2-3 minutes at the very end to restore color. The wire rack method helps prevent this by allowing air circulation.
Can I make this recipe ahead of time?
You can prep the chicken up to 12 hours ahead by seasoning and refrigerating it uncovered on a wire rack. This enhances flavor development. Bake it fresh when ready—reheating leftover baked chicken in the oven at 350°F for 20 minutes with a splash of water helps restore moisture. The skin won't be as crispy after reheating, but the meat remains delicious.
What's the best way to use the leftovers?
Shred the meat for tacos, sandwiches, or salads—it's perfect for lemon pepper chicken salad with mixed greens and avocado. Or make chicken pot pie by combining shreds with veggies and cream sauce. Store leftovers in an airtight container for 3-4 days or freeze for up to 3 months. The crispy skin loses its texture when reheated, but the flavor remains excellent!