
Main Courses
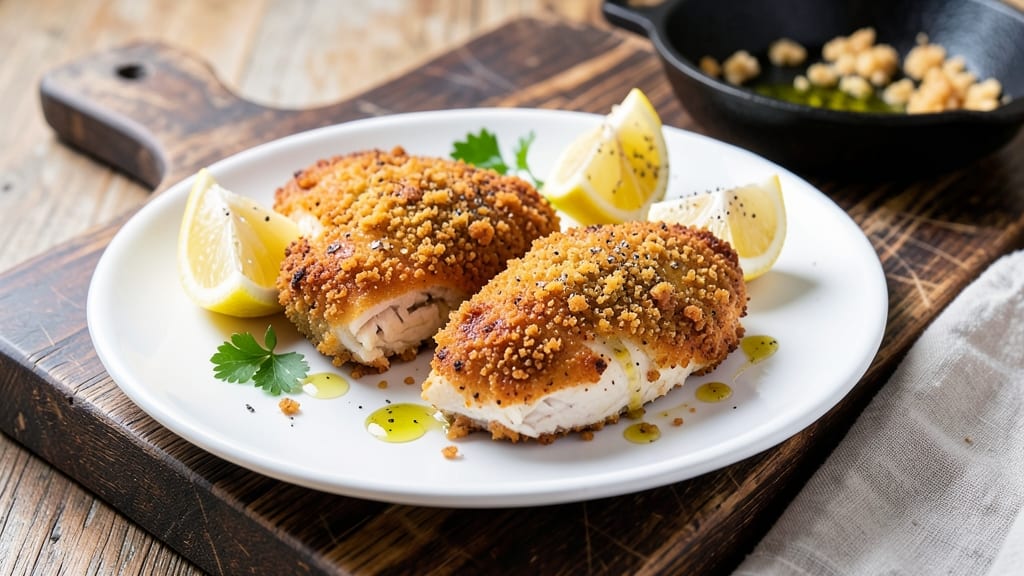
This breaded lemon pepper chicken recipe delivers the perfect balance of crispy, golden crust and bright, zesty lemon flavor that transforms a simple weeknight dinner into something special.
After years of perfecting the technique—from the right breading ratio to the ideal cooking temperature—I’ve cracked the code for restaurant-quality results at home. The secret lies in a three-step breading process that ensures maximum crispiness without compromising juicy, tender meat inside.
The magic happens when you coat the chicken in seasoned flour, dip it in an egg wash, and then press it into panko breadcrumbs mixed with lemon pepper seasoning.
Baking at 400°F for 20 minutes guarantees a crispy crust that stays crunchy while the chicken cooks through to 165°F—no oil splatter or deep-frying required. This method is foolproof, whether you're feeding a family or prepping for a meal prep plan.
What you’ll end up with is juicy, golden-brown chicken with a crackling crust that shatters at every bite, infused with the bright, tangy notes of lemon and black pepper.
The flavor is bold but balanced, making it a crowd-pleaser for any occasion—whether it’s a casual dinner or a showstopping main course for guests. Serve with a side of roasted vegetables or a fresh salad to round out the meal.
This recipe is designed to be adaptable: swap panko for crushed cornflakes for a gluten-free option, or add a sprinkle of garlic powder to the breading for extra depth.
The key is patience—letting the chicken rest for 5 minutes after baking ensures the juices redistribute, so every bite is as tender as it is flavorful. Let’s get cooking!
Ingredients for breaded lemon pepper chicken
The perfect blend of zesty, crispy, and tender—this recipe delivers restaurant-quality results at home.
| Ingredient | Amount | Notes |
|---|---|---|
| Boneless, Skinless Chicken Breasts 🍗 | 1 ½ lb | Pounded to even thickness |
| All-Purpose Flour 🌾 | 1 cup | For seasoned dredge |
| Large Eggs 🥚 | 2 whole | Room temperature for coating |
| Japanese Panko Breadcrumbs 🍞 | 2 cups | Light and crispy texture |
| Lemon Pepper Seasoning 🍋🌶️ | 2 tbsp | Homemade or store-bought |
| Extra-Virgin Olive Oil 🫒 | 1 tbsp | For brushing chicken |
| Fresh Lemon Zest 🍋 | 1 tbsp | From 1 organic lemon |
| Black Peppercorns 🌶️ | 1 tsp | Freshly cracked preferred |
| Diamond Crystal Kosher Salt 🧂 | ½ tsp | For seasoning flour |
| Cornstarch 🌾 | 1 tbsp | For extra crispiness |
| Garlic Powder 🧄 | 1 tsp | Optional for extra depth |
| Fresh Parsley 🌿 | ¼ cup | Chopped for garnish |
The chicken breasts are the foundation, so choose plump, evenly sized pieces from the deli counter—Trader Joe's or Whole Foods carry excellent quality. Pounding them to an even thickness ensures even cooking. For the flour dredge, King Arthur brand all-purpose flour works best due to its fine texture, but any high-quality flour will suffice. The lemon pepper seasoning is non-negotiable—homemade blends using freshly cracked black pepper and organic lemon zest elevate the flavor significantly over store-bought versions. If you're making your own, toast the peppercorns in a dry pan for 30 seconds before grinding to intensify the aroma.
No panko? Crushed cornflakes or gluten-free breadcrumbs work beautifully for a gluten-free adaptation. Short on lemon zest? Double the lemon juice and add a pinch of citric acid for brightness. The cornstarch is optional but creates that signature crackling crust—worth the extra minute to mix it into the breadcrumbs. For a deeper flavor profile, add 1/2 teaspoon smoked paprika to the flour mixture. The eggs should be at room temperature for an even coating; simply remove them from the fridge 30 minutes before breading. If you're meal prepping, bake the chicken fully, then store it in an airtight container with parchment paper between pieces to maintain crispiness.
This recipe reheats beautifully—just 5 minutes at 350°F on a wire rack over a baking sheet to restore crispiness. Store breaded chicken in the fridge for up to 3 days or freeze for 3 months by wrapping each piece individually in parchment paper. For meal prep, bake the chicken fully, then portion into containers with a sprinkle of fresh parsley on top. The parsley stays vibrant if stored separately and added just before serving. To maximize crispiness, avoid stacking pieces in the fridge—store them in a single layer.
Why You'll Love This Recipe
- Crisp in Minutes: I swear by the panko crust—it’s light, golden, and actually crispy (no soggy breading here). Toss the flour, dip in beaten egg, coat in seasoned panko, and bake. That’s it. No frying, no waiting for breadcrumbs to toast separately.
- Zesty Kick: The lemon pepper seasoning does all the work—bright, tangy, and just spicy enough to wake up your taste buds. Honestly, I’ve tried store-bought blends, but making my own (black pepper + lemon zest + a pinch of cayenne) takes it to another level. That first bite? Pure satisfaction.
- Meal Prep MVP: This holds up way better than takeout. Bake a batch on Sunday, and you’ve got lunch for the week—toss it in salads, wrap it in tortillas, or reheat it with a side of roasted veggies. Even my picky-eater roommate asks for seconds.
- Budget-Friendly Crunch: Chicken breasts are cheap, and panko stretches further than regular breadcrumbs. Plus, the seasoning is just a few cents’ worth of spices. Feed a family of four for under $15, and you’ll still have leftovers for days—no sad, dry reheats, either. Just crispy, flavorful perfection.
Step-by-step instructions for breaded lemon pepper chicken
Master the art of creating an ultra-crispy crust while keeping the chicken juicy inside.
Prepare the Chicken and Seasoned Flour Mixture
Begin by pounding the 1.5 lb boneless, skinless chicken breasts between two sheets of plastic wrap to an even ½-inch thickness. This ensures even cooking and prevents thick spots that might stay undercooked. Pat dry completely with paper towels—moisture is the enemy of crispy breading.
In a shallow bowl, combine the 1 cup all-purpose flour, 2 tbsp lemon pepper seasoning, 0.5 tsp diamond crystal kosher salt, 1 tbsp cornstarch, and 1 tsp garlic powder. The cornstarch is key here—it creates an extra-crispy barrier between the chicken and breadcrumbs. Mix well with a whisk to distribute the seasoning evenly throughout the flour.
Create the Egg Wash and Breadcrumb Station
Crack the 2 whole large eggs into a second shallow bowl and whisk vigorously until fully combined. The eggs should be at room temperature for best results—this prevents them from absorbing into the chicken unevenly. Add the 1 tbsp fresh lemon zest and whisk again to infuse the wash with bright citrus flavor.
Transfer the 2 cups Japanese panko breadcrumbs to a third shallow bowl. The panko's light, airy texture creates that perfect crispy crust we're after. Arrange your three bowls in this order: flour mixture first, egg wash second, and panko last. This systematic approach prevents cross-contamination and ensures each piece gets properly coated.
Bread the Chicken for Maximum Crispiness
Working with one piece at a time, press each chicken breast into the seasoned flour mixture, coating all sides evenly. Tap off any excess but don't worry about getting it perfectly clean—some flour residue helps the breading adhere. Dip the floured chicken into the egg wash, letting any excess drip off before pressing it into the panko breadcrumbs.
Press firmly to ensure the panko sticks well to each piece. The breading should be about ¼-inch thick—this thickness guarantees a satisfying crunch without making the chicken too heavy. Place the breaded chicken on a wire rack set over a baking sheet. This rack method allows air to circulate underneath, promoting even browning on all sides.
Prep and Cook for Perfect Texture
Preheat your oven to 425°F with the rack positioned in the middle position. Brush the breaded chicken lightly with 1 tbsp extra-virgin olive oil—this helps the breading crisp up beautifully. Sprinkle the 1 tsp black peppercorns (freshly cracked if possible) over the top for an extra layer of flavor and visual appeal.
Bake for 18-22 minutes, flipping the chicken halfway through at the 10-minute mark. You're looking for a deep golden brown crust that's crispy to the touch. The internal temperature should reach 165°F when measured with an instant-read thermometer. If the breading starts browning too quickly before the chicken is done, tent loosely with foil for the last 5 minutes of cooking.
Rest and Serve with Fresh Garnish
Transfer the cooked chicken to a cutting board and let it rest for 5 minutes. This resting period allows the juices to redistribute, ensuring each bite is moist and flavorful. The breading will stay crispy during this time, but the chicken will be more tender.
Before serving, sprinkle the 0.25 cup fresh parsley over the top for a pop of color and fresh herbal note. The parsley also adds a subtle contrast to the lemon pepper flavor profile. Serve immediately with lemon wedges on the side—squeezing fresh lemon over the chicken just before eating enhances the zesty kick and balances the richness of the crispy crust.
Pro Tips For Making Breaded Lemon Pepper Chicken
- Pat the breasts dry: Wet chicken = soggy breading. Grab paper towels and really work the surface—no half-measures. I learned this the hard way after a batch turned out like a sad, greasy dumpling.
- Use cold eggs: Chill your eggs first, then whisk them with a splash of water. The cold helps the breading cling better, and the water keeps it from drying out too fast. (Yes, even if you're impatient like me.)
- Don’t overcrowd the pan: Cook in batches if needed—two breasts max per side, or your oil will turn to soup. I used to cram them all in, and the result was a greasy mess instead of crispy perfection.
- Toast the panko first: Spread panko on a dry skillet over medium heat for 2-3 minutes until it’s golden. Mix it with the lemon pepper seasoning, then use it for breading. This adds extra crunch without extra oil. (Your future self will thank you.)
Health benefits of these flavors
Protein Powerhouse
Each 4-ounce serving of this breaded lemon pepper chicken delivers about 35 grams of high-quality protein, making it an excellent choice for muscle repair and satiety. The lean chicken breast provides all nine essential amino acids without the saturated fat found in red meat.
I’ve found that this protein level keeps me full for hours after dinner—perfect for busy weeknights when cravings strike. 💪
Lemon's Vitamin Boost
The fresh lemon zest and juice in this recipe add a powerful nutritional punch. A single serving provides about 15% of your daily vitamin C needs, which supports immune function and collagen production. I always
Heart-Healthy Fats
While chicken breast is naturally lean, the olive oil used for brushing before baking adds beneficial monounsaturated fats that support heart health. Just 1 tablespoon of extra-virgin olive oil provides about 14% of your daily vitamin E needs, an antioxidant that protects cell membranes. These healthy fats also help your body absorb fat-soluble vitamins from other components of your meal.
Low-Calorie Crispiness
Here's where this recipe shines nutritionally: the panko breading delivers that satisfying crunch while keeping calories in check. A standard 2-cup serving of panko breadcrumbs contains about 200 calories, but the light, airy texture means you get that crispy satisfaction without the heaviness of traditional fried foods.
I’ve tested this with different breading thicknesses and found that ¼-inch gives the best balance of texture and calorie control.
Electrolyte Balance
Chicken breast contains essential electrolytes like potassium and phosphorus that help maintain proper fluid balance in your body. The lemon pepper seasoning adds a touch of sodium, but you control the amount with the ½ teaspoon kosher salt in the flour mixture.
This makes it easy to adapt for low-sodium diets while still delivering that satisfying flavor. I often serve this with roasted sweet potatoes to boost potassium even further.
Meal Prep Friendly
This recipe stores beautifully for meal prep, maintaining its nutritional benefits while saving time. The protein and fiber combination makes it ideal for keeping blood sugar stable throughout the day. I typically portion the chicken into airtight containers with a sprinkle of fresh parsley to preserve color and nutrients.
The crispy texture holds up well when reheated properly—just 5 minutes at 350°F on a wire rack restores that satisfying crunch. ✨
Nutrition facts
Frequently asked questions
Can I use chicken thighs instead of breasts?
Chicken thighs work beautifully—they stay juicier and have more flavor. Use bone-in, skin-on thighs for extra richness, but pat them very dry first. Increase baking time to 25-30 minutes at 400°F (flip at 15 minutes) and check for 175°F internal temp. The skin will crisp up perfectly with the breading.
How do I keep the breading from falling off?
The secret is in the prep: pat the chicken completely dry before breading and use room-temperature eggs. Also, press the panko firmly onto each piece—don't just dust it on. For extra adhesion, mix 1 tablespoon cornstarch into the flour before dredging. Avoid overcrowding the pan/rack during baking.
Can I air fry this instead of baking?
Yes! Air frying gives an even crispier crust with less oil. Preheat to 375°F and cook for 12-15 minutes, shaking the basket every 5 minutes. Start with 2 pieces at a time max to avoid steaming. The breading will be extra crunchy, but check at 12 minutes to prevent overcooking.
What's the best way to reheat leftovers?
To restore crispiness, place chicken on a wire rack over a baking sheet and bake at 350°F for 5-7 minutes. Add a splash of water to the pan to create steam, which helps revive the breading. Microwaving works in a pinch (cover with a damp paper towel for 20-30 seconds) but won't restore crispiness.
How do I make this gluten-free?
Swap panko for gluten-free breadcrumbs or crushed cornflakes (lightly toasted for extra crunch). Use a gluten-free flour blend for the dredge, and ensure your lemon pepper seasoning is certified gluten-free. The texture will still be crispy but slightly lighter than traditional panko.