
Main Courses
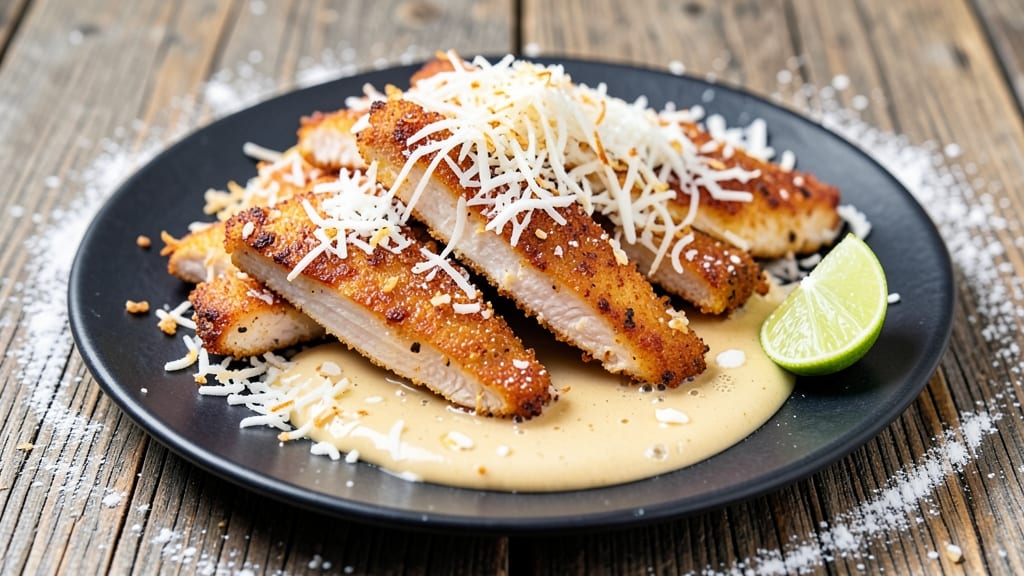
This baked coconut chicken tenders recipe delivers the perfect balance of tender chicken and buttery crisp coconut coating—no deep-frying required. I developed this technique after years of struggling with soggy breaded chicken, and the secret lies in a double-dredge method that locks in moisture while creating that coveted crunch.
The tropical coconut flavor pairs beautifully with the savory chicken, making it a crowd-pleaser for weeknight dinners or family gatherings.
The process is surprisingly simple: marinate the chicken in a light yogurt mixture for tenderness, then coat it in a combination of crushed coconut flakes and panko for that perfect texture. Baking at 400°F for 20 minutes ensures the exterior stays crispy while the interior remains juicy.
This method eliminates the mess of deep-frying while still delivering restaurant-quality results that your family will love.
What makes these tenders truly special is the flavor balance—sweet coconut, savory chicken, and just the right amount of spice. The crispy exterior gives way to tender, juicy chicken with every bite, and the coconut coating adds a tropical twist that feels indulgent yet simple to make.
Serve with a honey glaze or tropical salad for the ultimate meal experience.
Perfect for meal prep or serving immediately, these tenders reheat beautifully without losing their crispiness. My grandmother always said the best meals are the ones that feel special but don't require hours in the kitchen—and these coconut chicken tenders deliver exactly that. Let's get started!
Ingredients for baked coconut chicken tenders
Tender chicken meets tropical coconut in this crowd-pleasing recipe—no deep-fry mess!
| Ingredient | Amount | Notes |
|---|---|---|
| Boneless Chicken Breast 🍗 | 1 ½ lb | Cut into 1-inch strips |
| Plain Greek Yogurt 🥛 | ½ cup | Full-fat for creaminess |
| Unsweetened Shredded Coconut 🥥 | 1 cup | Toasted for extra flavor |
| Japanese Panko Breadcrumbs 🍞 | ½ cup | Light and crispy texture |
| All-Purpose Flour 🌾 | ¼ cup | For extra binding |
| Eggs 🥚 | 1 whole | Room temperature preferred |
| Lemon Juice 🍋 | 1 tbsp | Freshly squeezed |
| Garlic Powder 🧄 | 1 tsp | For subtle savory depth |
| Onion Powder 🧅 | ½ tsp | Enhances flavor |
| Salt 🧂 | 1 tsp | Kosher or sea salt |
| Ground Black Pepper 🌶️ | ½ tsp | Freshly ground preferred |
| Cayenne Pepper 🔥 | ¼ tsp | Adjust for heat preference |
| Olive Oil 🫒 | 2 tbsp | For brushing chicken |
The chicken is the star, so choose plump, boneless breasts—thick-cut pieces stay juicier. I always grab mine from Costco when they're on sale, but any supermarket brand works. Slice them into even 1-inch strips for consistent cooking. The yogurt marinade is non-negotiable for tenderness—full-fat Greek yogurt gives that creamy texture without making the coating soggy. Toast your shredded coconut in a dry pan for 3-4 minutes until golden—that extra flavor is worth the minute.
No panko? Regular breadcrumbs plus an extra tbsp of flour works in a pinch, but trust me on the panko. Short on coconut? Toasted almond flour or crushed cornflakes add a different crunch. The cayenne is optional, but if you love heat, go up to 1 tsp. For extra crispiness, I like to mix the panko and coconut with 1 tsp melted butter—just don't skip the egg wash between layers. Pro tip: Pat the chicken dry before marinating for the crispiest coating.
These reheat like a dream—5 minutes at 375°F brings back that crispy magic. Store leftovers in an airtight container for 3 days or freeze for 2 months. I always make a double batch because they disappear fast. The coating stays crispy if you keep them in a single layer on a wire rack while cooling. Serve with honey mustard or a mango salsa for the ultimate tropical twist.
Why You'll Love This Recipe
- No-Fuss Coating: I swear by the Greek yogurt trick—it keeps the chicken juicy while the panko and coconut create that perfect crunch. No messy breading station, just dip, coat, and bake. (Yes, even my kids can handle it.)
- Tropical Crunch Magic: That first bite? Crispy coconut meets tender chicken with a hint of sweetness—no sauce needed. The panko adds texture, but the coconut steals the show. Honestly, it’s the kind of flavor that makes you forget it’s "healthy."
- Weeknight & Meal Prep Hero: Double the batch on Sunday, and you’ve got lunch covered all week. The tenders reheat beautifully—crispy edges intact—so they’re my go-to for packed lunches or lazy dinners. (Between us, they disappear fast.)
- Budget Crunch Winner: Chicken breast is affordable, and the rest of the ingredients stretch far. I’ve made this for game nights, potlucks, and even a last-minute dinner—always a crowd-pleaser without breaking the bank. Not the prettiest, but the taste makes up for it.
Step-by-step instructions for baked coconut chicken tenders
Here's how to create golden, crispy chicken tenders with a tropical twist that'll have everyone asking for seconds.
Prepare the Chicken and Breading Station
Cut the 1.5 lb boneless chicken breast into 1-inch strips—about 12-15 pieces total. Pat them completely dry with paper towels; any moisture will prevent that perfect crispy crust. Arrange the chicken strips on a plate and brush both sides lightly with 1 tablespoon of the olive oil. This helps the breading adhere and creates a subtle golden sheen.
In a medium bowl, whisk together the 0.5 cup plain Greek yogurt, 1 tablespoon lemon juice, 1 teaspoon garlic powder, 0.5 teaspoon onion powder, 1 teaspoon salt, 0.5 teaspoon ground black pepper, and 0.25 teaspoon cayenne pepper. This tangy, seasoned yogurt mixture is the secret to juicy, flavorful tenders. The yogurt also acts as a natural tenderizer, keeping the chicken moist even after baking.
Create the Crispy Coconut Breading
In a separate shallow dish, combine the 0.25 cup all-purpose flour, 0.5 cup Japanese panko breadcrumbs, and 1 cup unsweetened shredded coconut. Give it a quick stir to distribute everything evenly. The panko adds airy crispiness while the coconut brings that tropical flavor we're after. If you want extra crunch, toast the coconut in a dry skillet over medium heat for 2-3 minutes until golden and fragrant—just don't let it burn!
Set up your breading station: place the yogurt mixture in one shallow dish, the flour-coconut-panko mix in another, and crack the 1 whole egg into a third shallow dish. The egg will help bind everything together for maximum crispiness. Here's where it gets fun—dip each chicken strip first into the yogurt, letting any excess drip off, then coat thoroughly in the flour-coconut mixture, pressing gently to ensure full coverage.
Bake to Golden Perfection
Preheat your oven to 400°F and line a baking sheet with parchment paper. Arrange the breaded chicken strips in a single layer, leaving about ½ inch between each piece. This spacing ensures even browning and crisping. For extra crispiness, lightly brush the tops with the remaining 1 tablespoon olive oil—just enough to coat the coconut without making it soggy.
Bake for 18-22 minutes, flipping the tenders halfway through at the 10-minute mark. You'll know they're done when they're deep golden brown and the internal temperature reaches 165°F at the thickest part. The coconut should be crispy with just a hint of caramelization. If they brown too quickly, tent with foil for the last few minutes to prevent burning while they finish cooking through.
Rest and Serve
Transfer the baked tenders to a wire rack and let them rest for 5 minutes. This resting period is crucial—it allows the breading to set properly and prevents the juices from pooling at the bottom. The tenders should be crispy on the outside with juicy, tender chicken inside that practically melts in your mouth.
Serve immediately with your favorite dipping sauces—think sweet chili, honey mustard, or a creamy garlic aioli. The contrast of the crispy coconut with a cool, tangy sauce is what makes these tenders irresistible. Store any leftovers in an airtight container for up to 2 days, but honestly? They won't last that long!
Pro Tips For Making Baked Coconut Chicken Tenders
- Pound Chicken Thin: Chicken breast stays tough when it’s thick—beat it down to ¼-inch with a rolling pin or meat mallet. Thin strips brown faster and cook through without drying out, especially when baking.
- Mix Yogurt Last: Add Greek yogurt to your breading mix right before dredging—it thickens when it sits. If you mix it in too early, the coconut coating turns gloppy and sticks messily to your hands.
- Skip Overcrowding: Bake tenders in a single layer with space between them. If you pile them on, steam builds up and turns your crispy coconut into soggy flakes. (Yes, even if your tray looks half-empty.)
- Toast Panko First: Lightly toast the Japanese panko in a dry pan for 2 minutes before mixing it in—it adds crunch and absorbs less moisture from the yogurt. Just 30 seconds of color makes a real difference.
Storing and reheating your baked coconut chicken tenders
Refrigerator Storage
Let your coconut chicken tenders cool completely before storing to prevent condensation that can make the coating soggy.
I always place them in a single layer on a wire rack for 10 minutes to dry, then transfer to an airtight container with a paper towel on top to absorb any excess moisture. They'll keep fresh in the fridge for 3 days—just reheat before serving.
The key is to store them in a way that maintains that crispy texture. 🥥
Freezer Prep
For longer storage, freeze your tenders in a single layer on a parchment-lined tray for 1 hour to prevent sticking. Once frozen solid, transfer them to a freezer-safe bag or airtight container. They'll stay good for up to 2 months.
When ready to eat, thaw overnight in the fridge before reheating. I like to portion them into individual bags for easy grab-and-go meals. ❄️
Reheating Like a Pro
To revive that crispy coating, I recommend reheating in a 400°F oven for 8-10 minutes on a wire rack. The heat circulates around the tenders, restoring that perfect crunch. For the microwave method, cover with a damp paper towel and heat in 30-second intervals until reaching 165°F.
Add a splash of water if they seem dry. The oven method always gives me the best results. 🔥
Serving Leftovers
These tenders reheat beautifully for lunches or quick dinners. I often serve them with a side of pineapple salsa or mango avocado salad to keep the tropical theme going. The coconut flavor pairs perfectly with these fresh, bright sides. Just
Meal Prep Tips
Make a double batch and store half for later—trust me, you'll thank yourself later. I like to prep the tenders fresh for the first 2 days, then freeze any extras. When reheating, I always add ½ teaspoon of coconut oil to the baking sheet to help restore that crispy texture. The coconut flavor actually improves slightly after reheating, making leftovers taste even better. 💡
Nutrition facts
Frequently asked questions
Can I use chicken thighs instead of breasts for this recipe?
Yes, you can substitute chicken thighs, but you'll need to adjust the cooking time. Thighs are more forgiving and stay juicier, so bake them for 25-30 minutes at 400°F, flipping halfway. The skin will crisp up beautifully with the coconut coating, adding extra flavor. Just trim any excess fat first to prevent burning.
Why is my coconut coating turning soggy instead of crispy?
Soggy coatings usually happen when the chicken isn't dry enough or the oven temperature isn't high enough. Always pat your chicken completely dry before breading, and make sure your oven is fully preheated to 400°F. For extra crispiness, bake on the top rack and avoid overcrowding the pan.
Can I make these tenders ahead of time for a party?
These reheat beautifully, making them perfect for meal prep. Assemble the tenders up to 24 hours ahead and refrigerate uncooked. Bake straight from the fridge (add 5 extra minutes to cooking time). For cooked tenders, freeze them for up to 2 months—just thaw overnight before reheating.
What's the best way to make them gluten-free?
Swap the panko and flour for 1 cup gluten-free breadcrumbs and ¼ cup gluten-free flour. The coconut will still provide plenty of texture, and the yogurt marinade ensures tenderness. Just make sure your breadcrumbs are labeled gluten-free to avoid cross-contamination.
How do I know when the chicken is fully cooked?
Use a meat thermometer to check the thickest part of the chicken—it should read 165°F. The tenders will also be golden brown and crispy on the outside. If you don't have a thermometer, cut into one piece to check for white meat with no pink—this means it's safely cooked through.