
Main Courses
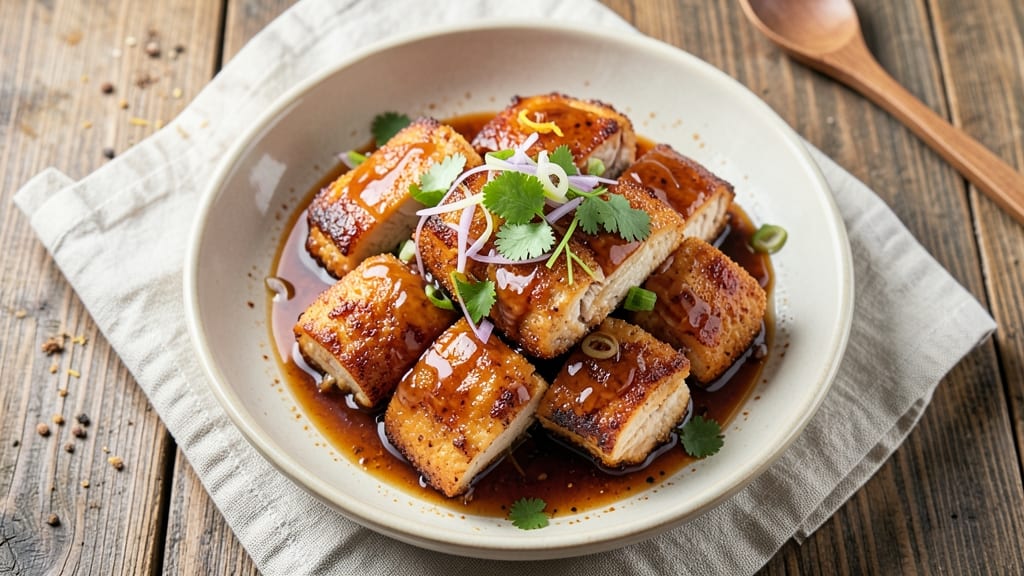
This Asian fried chicken breast recipe delivers the perfect balance of crispy-spiced crunch and juicy centers—a game-changer for weeknight dinners. The secret lies in a dual marinade that tenderizes while infusing bold flavors, followed by a precise breading technique that ensures every bite stays crispy.
I developed this recipe after years of testing, and it’s now my go-to for restaurant-quality results at home without the fuss.
The process is straightforward but transformative: chicken breasts marinate in a blend of soy, ginger, and garlic for tender, flavorful meat, then get double-breaded with cornstarch and rice flour for that signature crunch.
Frying at the right temperature keeps the outside crispy while the inside stays juicy—no dry, rubbery chicken here. The result? A dish that’s equally impressive served with steamed rice or stir-fried vegetables.
What sets this recipe apart is the harmony of textures and flavors—crispy exterior, tender interior, and a savory-sweet glaze that ties everything together. The marinade’s umami depth and the breading’s crunch create a contrast that’s impossible to resist.
Whether you’re feeding a family or craving a satisfying solo meal, this recipe delivers every time.
Ready in about 45 minutes, this fried chicken breast is foolproof, customizable, and perfect for meal prep. The key is patience—don’t rush the marinating or frying, and you’ll be rewarded with golden, flavorful bites that taste like they came from your favorite Asian bistro. Let’s get started!
Ingredients for asian fried chicken breast
Fourteen ingredients, zero shortcuts—just the good stuff for restaurant-style Asian fried chicken.
| Ingredient | Amount | Notes |
|---|---|---|
| Boneless, Skinless Chicken Breast 🍗 | 1 ½ lb | Pounded to even thickness |
| Cornstarch 🌾 | ½ cup | For ultra-crispy texture |
| Rice Flour 🌾 | ½ cup | Lightens breading further |
| All-Purpose Flour 🌾 | ½ cup | For structural adhesion |
| Diamond Crystal Kosher Salt 🧂 | 1 tbsp | For seasoning marinade |
| Black Peppercorns 🌶️ | 1 tsp | Freshly cracked |
| Garlic Cloves 🧄 | 6 cloves | Minced for marinade |
| Fresh Ginger 🌿 | 1 tbsp | Grated, aromatic |
| Soy Sauce 🍶 | ¼ cup | High-quality preferred |
| Sesame Oil 🫒 | 1 tbsp | Toasted aroma |
| Vegetable Oil 🫒 | 3 cups | High smoke point |
| Honey 🍯 | 1 tbsp | For glaze sweetness |
| Rice Vinegar 🍶 | 1 tbsp | Balances sweetness |
| Green Onions 🧅 | 2 whole | Sliced for garnish |
| Sesame Seeds 🌾 | 1 tbsp | Toasted for crunch |
The chicken breasts are the foundation, so pick uniformly sized ones—thicker cuts need pounding to even thickness. Trader Joe's or Costco often have pre-cut boneless breasts, but if buying whole, trim the fat and pound to about 1/4-inch thickness. For the marinade, Kikkoman soy sauce is my go-to, but any high-quality brand works. Fresh ginger is non-negotiable here—dried just won’t cut it. The cornstarch and rice flour combo is the secret to that signature crunch without heaviness. Bob’s Red Mill rice flour is my favorite, but any brand works if it’s labeled 100% rice flour.
No sesame oil? Light olive oil at half the amount works in a pinch, but you’ll miss that nutty aroma. Short on honey? Maple syrup or agave keeps it vegan-friendly. The green onions can be swapped for cilantro if you prefer, but I find the onion’s mild sharpness complements the dish better. For the glaze, balance is key—start with equal parts honey and vinegar, then adjust to taste. If you’re frying, peanut oil has a higher smoke point than vegetable oil, but either works fine. And trust me, toasting the sesame seeds in a dry pan for 30 seconds makes all the difference.
This chicken stays crispy for about 2 hours at room temperature if you’re serving a crowd, but best eaten fresh. Store leftovers in an airtight container for 3 days—reheat in a skillet with a splash of oil to restore crispiness. Freezes beautifully for 2 months, though the texture gets slightly softer after thawing. I always make double batches because it disappears fast. The glaze can be made ahead and reheated separately if you’re prepping components in advance.
Why You'll Love This Recipe
- No Fuss Crisp: The three-flour blend—cornstarch, rice flour, and all-purpose—gives you that perfect crunch without fussing over double-dredging. I just pound the chicken thin, toss it in the mix, and fry it once. That’s it. No stress, no mess.
- Salty-Sweet Magic: Honestly, the Diamond Crystal kosher salt (used sparingly in the marinade) makes all the difference—it cuts through the richness while keeping the center juicy. The rice flour adds a subtle sweetness that balances the crispy exterior. It’s the kind of flavor that makes you reach for seconds immediately.
- Lunchbox Hero: Between us, this is my go-to for packed lunches. The chicken stays crispy for days if you store it right (airtight container, parchment between layers), and it reheats like a dream—just a quick pan sear or air fryer blast. My kids grab these before soccer practice without complaint.
- Budget Crunch: I buy chicken breast in bulk, and this recipe stretches it further than any other I’ve tried. The flour blend is cheap, and you can even make your own seasoning mix to reuse. Plus, leftovers? They’re the best kind—tasty enough to eat cold the next day or toss into stir-fries for a lazy dinner.
Step-by-step instructions for crispy-spiced Asian fried chicken breast
Here's how to nail that perfect balance of crunchy exterior and tender interior every time.
Prepare the Chicken and Marinade
Start by pounding the 1.5 lb boneless, skinless chicken breast between two sheets of plastic wrap to an even ½-inch thickness using a meat mallet. This ensures even cooking and prevents dryness. Place the pounded chicken in a bowl and mix with ½ cup soy sauce, 1 tbsp honey, and 1 tbsp rice vinegar. Let it marinate for at least 30 minutes at room temperature—this infuses flavor and keeps the meat juicy.
While the chicken marinates, make the marinade paste by combining 6 minced garlic cloves, 1 tbsp grated fresh ginger, 1 tbsp sesame oil, 1 tbsp Diamond Crystal kosher salt, and 1 tsp freshly cracked black peppercorns in a small bowl. Mix well and set aside. The garlic and ginger will release their aromatic oils, deepening the flavor profile of your chicken.
Create the Triple-Layer Breading
In a shallow dish, whisk together ½ cup all-purpose flour, ½ cup rice flour, and ½ cup cornstarch. This triple-layer combination creates an ultra-crispy coating while keeping the interior moist. The rice flour adds lightness, the all-purpose flour provides structure, and the cornstarch ensures that signature crunch.
In another shallow dish, add the marinade paste you prepared earlier. Dip each piece of marinated chicken into the paste, ensuring it's fully coated. Then, press each piece into the flour mixture, coating it evenly on all sides. Let the breaded chicken rest for 10 minutes before frying—this allows the coating to adhere better and prevents clumping in the oil.
Heat the Oil and Fry to Golden Perfection
Fill a deep skillet or Dutch oven with 3 cups vegetable oil and heat it over medium-high heat until it reaches 350°F. Use a deep-fry thermometer to monitor the temperature—this is crucial for achieving that perfect crisp. The oil should shimmer but not smoke excessively.
Carefully add the breaded chicken pieces to the hot oil, working in batches if needed to avoid overcrowding. Fry for 4-5 minutes per side until the coating is deep golden brown and the chicken reaches an internal temperature of 165°F. The coating should be crispy enough to hold its shape when lifted with tongs. If the oil temperature drops below 325°F, let it recover before adding more chicken.
Drain and Glaze for Extra Shine
Transfer the fried chicken to a wire rack set over a baking sheet to drain excess oil. This step is key for that restaurant-quality shine and prevents sogginess. While still hot, drizzle the chicken with a mixture of 1 tbsp honey and 1 tbsp rice vinegar for a glossy finish. The honey adds a subtle sweetness, while the vinegar balances the richness.
Sprinkle with 1 tbsp toasted sesame seeds and 2 sliced green onions for added texture and color. Serve immediately while the coating is still crispy and the chicken is piping hot. The contrast of the crunchy exterior and juicy interior is what makes this recipe truly special.
Rest and Serve with Confidence
Let the fried chicken rest for 2-3 minutes before serving. This brief rest allows the juices to redistribute, ensuring each bite is as moist as the first. Serve with your favorite dipping sauce or alongside a simple green salad to balance the richness.
Here's the thing—this method guarantees crispy, golden-brown chicken every time. The secret lies in the triple-layer coating, precise oil temperature, and that final glaze. Trust the process, and you'll have restaurant-quality Asian fried chicken right in your kitchen.
Pro Tips For Making Asian Fried Chicken Breast
- Pound It Thin: Chicken breast fights back when it’s thick—flatten it to ¼-inch with a meat mallet or rolling pin before dredging. I learned this the hard way after biting into a chewy, half-raw center that tasted like overcooked cardboard. Thin slices cook faster and crisp up evenly.
- Double-Dredge Dry: Pat the chicken bone-dry after the first flour coat—no wet spots. Rice flour and cornstarch need a dry surface to stick like glue. I used to rush this, and my crust would clump or slide off. Take the extra 10 seconds; it’s non-negotiable.
- Fry in Batches: Crowd the pan, and the oil temperature drops like a rock. Two pieces max per batch in 350°F oil—any more, and you’ll get greasy, soggy results. I once fried six at once and ended up with a sad, limp pile. Patience here means crispy, golden perfection.
- Rest Before Frying: Let the dredged chicken sit on a wire rack for 5 minutes—yes, even if you’re impatient. This lets the coating adhere fully and prevents a messy, uneven crust when it hits the oil. I skipped this once and had half the pieces falling apart mid-fry.
Serving suggestions for this recipe
Classic Rice Pairing
Steamed jasmine rice is my go-to side for this fried chicken—its delicate floral aroma complements the savory-sweet glaze beautifully. Use a 1:2 rice-to-water ratio and cook until just tender (about 15 minutes in a rice cooker).
For extra flair, stir in 1 tsp toasted sesame oil and ½ tsp soy sauce while still hot. The rice soaks up any fallen crumbs and balances the dish's richness. 🌾
Crunchy Slaw Contrast
A quick coleslaw made with shredded cabbage, carrots, and a tangy dressing of rice vinegar, sesame oil, and a touch of honey cuts through the fried chicken's richness.
Toss 2 cups shredded cabbage with 1 tbsp sesame oil, 1 tbsp rice vinegar, and ½ tsp honey—the acidity brightens every bite. Add ¼ cup chopped cilantro for freshness.
Spicy Dipping Sauces
Skip the heavy ranch—opt for lighter dipping sauces that enhance the chicken's flavors. My favorite is a mix of 2 tbsp soy sauce, 1 tbsp rice vinegar, 1 tsp honey, and ½ tsp sriracha.
For a nutty twist, blend 2 tbsp peanut butter with 1 tbsp soy sauce and 1 tsp lime juice. Serve in small bowls for dipping—these sauces add layers of flavor without overpowering the chicken. 🍶
Quick Stir-Fried Veggies
Stir-fry bell peppers, broccoli, and snap peas in 1 tbsp sesame oil with 1 minced garlic clove and a splash of soy sauce for a fast, nutritious side.
The veggies add color and texture while keeping the meal balanced. Cook for 4-5 minutes over high heat—just until crisp-tender. Finish with 1 tbsp toasted sesame seeds for extra crunch.
Garnish Like a Pro
Elevate your plate with a few simple garnishes. Scatter sliced green onions and toasted sesame seeds over the chicken for color and texture. For a pop of freshness, add microgreens or thinly sliced cucumber ribbons. These finishing touches make your dish look restaurant-worthy without extra effort. 💫
Make It a Meal
Turn this into a full meal by serving with a simple miso soup or a side of edamame. The umami depth of miso pairs perfectly with the fried chicken, while steamed edamame adds a protein boost.
For a heartier option, add a quick-pickled cucumber salad—toss sliced cucumbers with rice vinegar, sugar, and a pinch of red pepper flakes for a refreshing contrast.
Nutrition facts
Frequently asked questions
Can I substitute chicken thighs for breasts in this recipe?
Chicken thighs work differently due to their higher fat content and darker meat. For best results, use bone-in, skin-on thighs (pounded to ½-inch thickness) and reduce frying time to 3-4 minutes per side—they cook faster and stay juicier. Skip the pounding step since thighs are naturally thicker. The crispy coating will still form beautifully, but expect a richer flavor profile.
How do I keep the breading extra crispy without making the chicken dry?
The triple-layer breading (flour + rice flour + cornstarch) is your secret weapon! For extra crunch, chill the breaded chicken on a wire rack in the fridge for 15 minutes before frying—this firms up the coating. Also, maintain oil at 350°F and avoid overcrowding the pan. The key is resting the chicken for 2-3 minutes after frying before serving—this lets juices redistribute while keeping the outside crisp.
What's the best way to reheat leftover fried chicken?
To restore crispiness, reheat in a 350°F oven for 8-10 minutes on a wire rack (not a plate) with a splash of oil sprayed on the coating. For stovetop, use medium-low heat in a skillet with ¼-inch oil—this prevents sogginess. Microwaving works in a pinch (cover loosely with a paper towel for 20 seconds), but expect slightly softer texture. Store leftovers in an airtight container for 3 days—the coating stays crisp for about 2 hours at room temperature.
Can I make this recipe ahead of time?
Prep the marinade and breading up to 24 hours ahead—store separately in the fridge. For the chicken, bread it and refrigerate for up to 6 hours before frying (cover with plastic wrap). Freeze uncooked breaded chicken for 2 months—thaw overnight in the fridge before frying. The glaze can be made 3 days ahead and reheated separately. Pro tip: Freeze cooked chicken in a single layer, then transfer to a bag to preserve crispiness.
Why did my chicken turn out greasy instead of crispy?
Greasy chicken usually means one of three things: oil was too cool (keep it at 350°F), you overcrowded the pan (fry in batches), or the coating wasn't dry enough (pat chicken dry before breading). For extra crispiness, use a mix of vegetable and peanut oil (peanut has a higher smoke point). Also, ensure your cornstarch is fresh—old cornstarch loses its crisping power. Let the breaded chicken rest 10 minutes** before frying to help the coating adhere properly.