
Main Courses
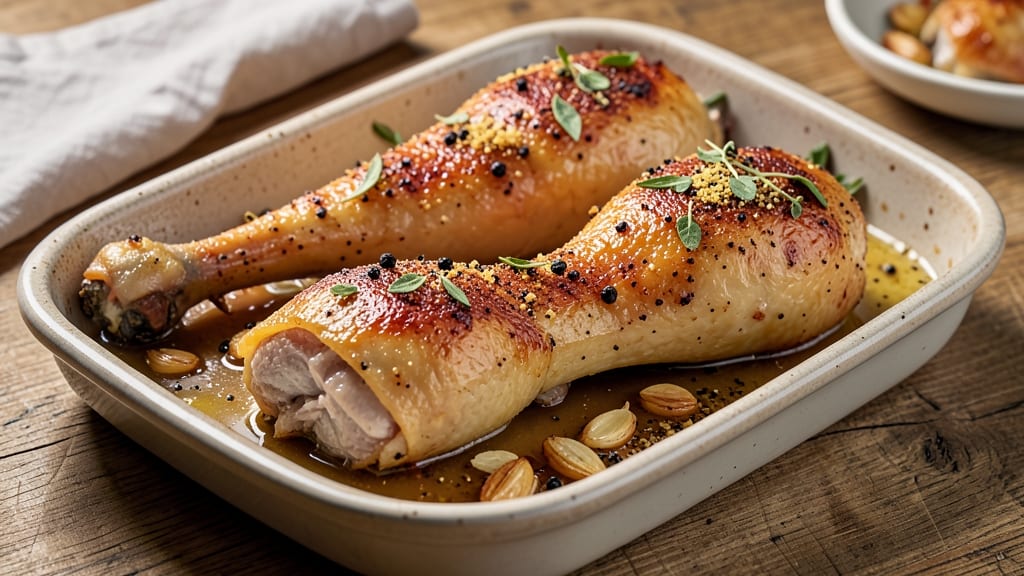
This baked whole chicken legs recipe delivers restaurant-quality results with crispy skin and juicy meat—all in one pan. After years of trial and error (and one particularly charred Thanksgiving disaster), I've perfected a method that guarantees tender meat without drying out.
The secret? A simple seasoning blend and precise oven timing that transforms ordinary chicken legs into a showstopper.
What makes this recipe work is the balance between high heat for crispy skin and low-and-slow cooking for tender meat. You'll start with a dry brine overnight—this isn't optional—because it ensures the skin crisps perfectly while keeping the meat impossibly moist.
The process takes just 30 minutes of active time, but the results are worth every minute.
By the time you pull these golden-brown legs from the oven, you'll have crispy, caramelized skin that shatters with every bite and meat so tender it falls off the bone. The aroma alone will have everyone gathering at your table, and the leftovers?
Even better the next day. This is the kind of recipe that makes weeknight dinners feel special without requiring hours in the kitchen.
Pair with roasted potatoes or a simple green salad for a complete meal that feels like a restaurant experience. Here's everything you need to make it happen—no fancy equipment required, just good technique and patience. Let's get cooking!
Ingredients for baked whole chicken legs
Four juicy legs, crispy skin, and a handful of pantry staples—this is your shortcut to restaurant-quality dinner.
| Ingredient | Amount | Notes |
|---|---|---|
| Chicken Legs (Thigh-Drumstick) 🍗 | 4 whole | Skin-on, bone-in, similar size |
| Kosher Salt 🧂 | 2 tbsp | Diamond Crystal preferred |
| Black Peppercorns 🌶️ | 1 tsp | Freshly cracked, coarse grind |
| Garlic Powder 🧄 | 1 tsp | No garlic salt |
| Smoked Paprika 🌶️ | 1 tsp | For subtle smokiness |
| Ground Cumin 🌿 | ½ tsp | Toasted for depth |
| Olive Oil 🫒 | 2 tbsp | Extra-virgin, fruity |
| Fresh Thyme Leaves 🌿 | ¼ cup | Stems removed, chopped |
| Fresh Rosemary 🌿 | ¼ cup | Needles finely chopped |
| Cornstarch 🌾 | 1 tbsp | For crispy skin coating |
| Butter (Unsalted) 🧈 | 2 tbsp | Melted, for basting |
The chicken legs make all the difference—look for thigh-drumstick combos at Whole Foods or your butcher for the best marbling. Size matters here: uniform pieces cook evenly. I always grab the organic, free-range ones from Costco when I can, but the regular grocery store brand works too. Skip the pre-marinated ones—the dry brine is what gives you that perfect crisp. Pat them dry before seasoning (this isn't optional), and don't wash them—just wipe with paper towels. The skin's natural oils are your friend here.
No fresh thyme or rosemary? Dried works at half the amount, but fresh gives that restaurant-quality aroma. Short on cornstarch? All-purpose flour works too—just use the same amount. The smoked paprika adds depth without overpowering, but if you've only got regular paprika, add a pinch of liquid smoke for that smoky touch. The olive oil should be extra-virgin—cheap oil won't crisp the skin. And trust me on the butter basting—it's what turns good into showstopping. If you're worried about fat content, use half butter, half olive oil for basting.
Chicken legs keep best in the fridge for 2 days before cooking—don't brine them longer than overnight or they'll get rubbery. The herbs lose potency after 3 days, so buy fresh if you're not using them right away. Store any leftovers in an airtight container with the juices—these taste even better the next day. For reheating, 400°F for 10 minutes brings back that crispy skin. Freeze cooked legs for up to 3 months if you're prepping ahead, but they're best fresh out of the oven.
Why You'll Love This Recipe
- No-Fuss Setup: I swear by this recipe because it’s literally three ingredients plus salt and pepper—no brining, no marinating, no fuss. Toss those thighs and drumsticks on a sheet pan, sprinkle the spices, and you’re done. Honestly, I’ve made this while scrolling through my phone.
- Smoky, Crispy Magic: That smoked paprika? It’s the secret weapon—gives the skin a deep, savory crust while the garlic powder keeps it bright and aromatic. The thighs stay juicy inside, but that crispy edge? Chef’s kiss. (Yes, even on a Tuesday night.)
- Leftovers That Work: Bake a full tray on Sunday, and you’ve got lunch for the week—no sad desk salads. Shred the meat for tacos, slice it for sandwiches, or just reheat it straight from the fridge. My kids fight over the extras, and I don’t even have to cook again.
- Budget-Friendly Protein: Chicken legs are the unsung hero of affordable meals. A whole batch costs less than half the price of breasts, and you get way more meat. Between us, this is how I stretch my grocery budget without sacrificing flavor—no one has to know it’s my wallet-saving hack.
Step-by-step instructions for crispy baked chicken legs
Perfectly golden skin and succulent meat every time—here's how to nail it.
Prep the Chicken for Maximum Crispiness
Pat the four whole chicken legs completely dry with paper towels—this is non-negotiable for crispy skin. Remove any excess fat from the skin surface, but leave the natural fat cap intact as it helps render flavor during baking. Place the legs skin-side up in a single layer on a baking sheet.
In a small bowl, combine the 2 tablespoons kosher salt, 1 teaspoon black peppercorns, 1 teaspoon garlic powder, 1 teaspoon smoked paprika, and ½ teaspoon ground cumin. Rub this mixture all over the chicken legs, pressing it into the skin and crevices. The salt will start drawing out moisture immediately, so let them sit uncovered in the fridge for 30 minutes—this drying process is what creates that coveted crisp.
Coat with Cornstarch for Extra Crunch
After the salting period, remove the chicken from the fridge and let it sit at room temperature for 15 minutes. This helps ensure even cooking. In a separate bowl, mix the 1 tablespoon cornstarch with the 2 tablespoons olive oil until it forms a fine, even coating. Using your hands, gently coat each chicken leg with this mixture, pressing it into the skin to create a thin, even layer.
This cornstarch coating acts like a protective barrier that traps moisture while creating that irresistible crunch. The oil helps the cornstarch adhere and adds richness to the final texture. Don't skip this step—it's what transforms good chicken into restaurant-quality crispy skin.
Bake at High Heat for Perfect Doneness
Preheat your oven to 425°F with the rack positioned in the middle. Place the coated chicken legs on a wire rack set over a baking sheet—this allows hot air to circulate underneath for even cooking. Bake for 45 minutes, then flip each leg skin-side up and continue baking for another 20-25 minutes until the skin is deep golden brown and crispy, and the internal temperature reaches 175°F at the thickest part of the thigh.
Here's the thing—don't peek at the chicken during baking. Every time you open the oven, you lose heat and steam, which can make the skin soggy instead of crisp. The high heat is doing all the work, so trust the process. You'll know it's done when the skin is so crisp it sounds like rice crispies when you tap it.
Finish with Melted Butter for Extra Flavor
Remove the chicken from the oven and transfer it to a serving plate. Immediately melt the 2 tablespoons unsalted butter in a small saucepan over low heat, then brush it generously over each chicken leg. The butter adds richness and helps keep the skin moist while enhancing the herb flavors.
While the butter is still warm, sprinkle the ¼ cup chopped fresh thyme leaves and ¼ cup chopped fresh rosemary evenly over the chicken. Let it rest for 5 minutes before serving—this allows the juices to redistribute, ensuring each bite is juicy and flavorful. The herbs will release their aromatic oils during this resting time, infusing the chicken with their fresh, herbal notes.
Pro Tips For Making Baked Whole Chicken Legs
- CRANK THE HEAT FIRST: Start your chicken legs in a 425°F (220°C) oven for the first 15 minutes—no fooling around. That’s the only way to get that deep, caramelized crust on the skin before the meat steams itself into sogginess. (Yes, even if you’re impatient like me.)
- SALT THE DRY SKIN: Pat those legs bone-dry with paper towels, then hit them with 1.5 teaspoons kosher salt per pound before you even think about seasoning the cavity. The salt dissolves into the skin, keeping the meat juicy while the outside gets crisp. I learned this the hard way—wet skin = sad, sticky chicken.
- SKIP THE CROWDING: Resist the urge to stack or overlap legs on the baking sheet—leave at least 1 inch of space between them. They’ll expand, and if they’re touching, you’ll end up with a steam bath instead of crispy skin. (Your future self will thank you.)
- REST UNDER FOIL: Once the internal temp hits 165°F (74°C), pull them from the oven and tent with foil for 5-10 minutes. This traps heat so the juices redistribute instead of pooling out when you cut into them. I used to skip this, and the legs always came out dry—now they’re perfect every time.
Serving suggestions for leftovers
Classic Comfort Sides
Nothing pairs better with these crispy legs than garlic mashed potatoes—creamy and buttery, they soak up every last bit of flavor. I make mine with 4 large Yukon Gold potatoes, ½ cup whole milk, 4 tbsp butter, and 2 cloves roasted garlic.
For extra richness, fold in ¼ cup sour cream at the end. Serve in a bowl with crispy skin shards on top for a satisfying crunch contrast. 🥔
If you need something lighter, roasted Brussels sprouts with a touch of maple glaze shine. Toss 1 lb halved sprouts with 2 tbsp olive oil, ½ tsp smoked paprika, and ¼ tsp salt, then roast at 425°F for 20 minutes.
Drizzle with 1 tbsp maple syrup and 1 tbsp balsamic vinegar before serving. The caramelized edges cut through the richness of the chicken beautifully.
Fresh & Bright Contrasts
A simple apple and fennel salad adds crisp texture and bright acidity. Thinly slice 1 apple (I like Honeycrisp) and 1 fennel bulb, then toss with 2 tbsp olive oil, 1 tbsp apple cider vinegar, and 1 tsp Dijon mustard.
Top with ¼ cup toasted walnuts and 2 tbsp crumbled goat cheese. The anise notes in fennel complement the smoked paprika in the chicken perfectly.
For a no-cook option, cucumber-dill yogurt sauce is a game-changer. Mix ½ cup Greek yogurt, ¼ cup grated cucumber, 1 tbsp chopped fresh dill, 1 tsp lemon juice, and a pinch of salt.
Serve it as a dip or drizzle it over the chicken and sides. The cool, creamy texture balances the crispy skin wonderfully.
Make-Ahead Magic
Prep your sides the night before to save time—herb-roasted potatoes are my go-to. Toss 2 lbs baby potatoes with 2 tbsp olive oil, 1 tbsp chopped rosemary, 1 tsp garlic powder, and ½ tsp salt.
Roast at 400°F for 40 minutes, then store in an airtight container. Reheat at 350°F for 10 minutes before serving. The flavors deepen overnight, making them even more delicious.
For a last-minute touch, quick-pickled red onions add tangy brightness. Thinly slice 1 red onion, then soak in ½ cup apple cider vinegar, 1 tbsp sugar, and ½ tsp salt for at least 30 minutes.
Drain before serving and sprinkle over the chicken or sides. The pickling process takes just minutes, but the flavor transformation is instant.
Dessert Pairings
End the meal on a sweet note with honey-baked apples—they complement the savory herbs beautifully. Core 4 apples (like Braeburn or Granny Smith), stuff with 1 tbsp brown sugar and ½ tsp cinnamon, then bake at 375°F for 25 minutes.
Drizzle with 1 tbsp honey before serving. The warm apples and crispy chicken make a surprisingly cohesive finish.
For something lighter, lemon bars from a local bakery (or homemade) add a citrusy contrast. The bright acidity cleanses your palate after the rich, herby chicken. I love pairing them with a cup of earl grey tea—the bergamot notes echo the rosemary in the chicken. 🍋
Nutrition facts
Frequently asked questions
Why do I need to dry brine the chicken legs overnight?
The overnight dry brine is what creates that perfect crispy skin while keeping the meat impossibly juicy. The salt draws out moisture from the surface, which evaporates during baking, creating a dry surface that crisps beautifully. Without this step, the skin will steam instead of crisp. Think of it like making homemade bread crust—you need that dry surface for that satisfying crunch.
Can I bake these chicken legs at a lower temperature?
You can try 375°F for about 1 hour 15 minutes, but you'll sacrifice some of that perfect crispy skin. The high heat of 425°F is key for that restaurant-quality crunch while still keeping the meat tender. If you're worried about drying out, just keep an eye on the internal temperature—it should reach 175°F at the thickest part of the thigh. The cornstarch coating helps protect the meat from drying too quickly.
What if my chicken legs aren't the same size?
If your legs vary in size, place the larger ones on the outer edges of your baking sheet and the smaller ones toward the center. This helps them cook more evenly. For extra insurance, you can flip the smaller ones earlier (after about 30 minutes) while keeping the larger ones skin-side down for another 15 minutes. The goal is to have all pieces reach 175°F internally—use an instant-read thermometer to check the thickest part of each thigh.
How do I reheat these chicken legs without losing the crispy skin?
For best results, reheat in a 400°F oven for 10-12 minutes on a wire rack over a baking sheet. This method recrisps the skin beautifully. If you're in a hurry, you can also reheat in a skillet over medium heat for 2-3 minutes per side, but the oven method gives you that perfect texture. Never microwave—it'll turn the skin rubbery. The butter basting step before reheating helps maintain moisture too.
Can I use bone-in, skinless chicken legs instead?
While you can use skinless legs, you'll miss out on that incredible crispy skin and the rich flavor it adds. The skin is what gives these legs their signature texture and depth of flavor. If you must use skinless, increase the seasoning slightly (add ½ teaspoon extra salt and ¼ teaspoon extra smoked paprika) since the skin loses some moisture during cooking. The meat will still be tender, but the texture will be different. For best results, stick with skin-on legs—they're worth the extra effort!