
Main Courses
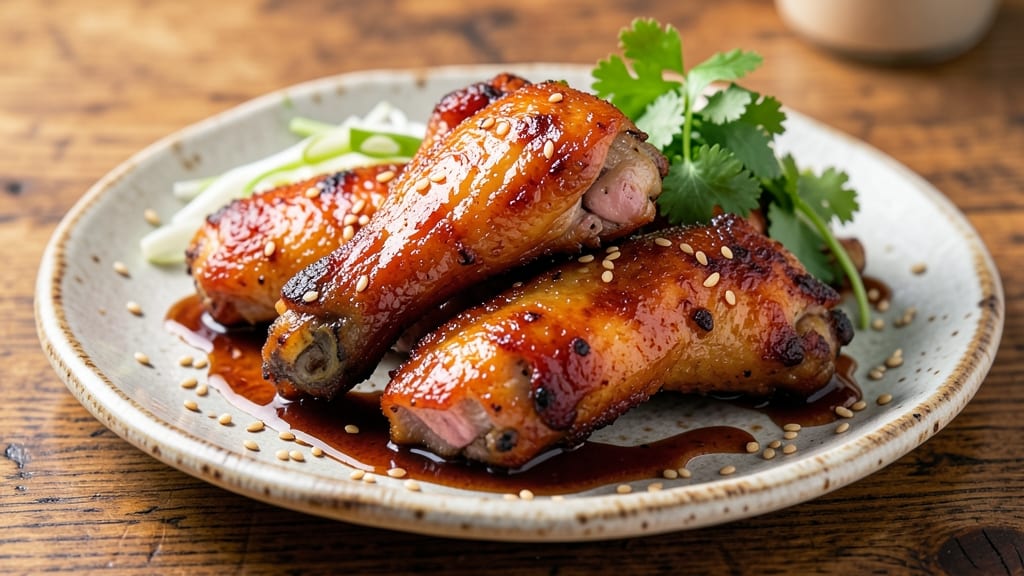
This baked teriyaki chicken wings recipe delivers the perfect balance of caramelized crunch and sticky-sweet glaze—no deep fryer required. 🔥 After years of perfecting my technique at The Smoky Pig, I've developed a method that transforms simple chicken wings into restaurant-quality bites with crispy edges and tender meat.
The secret lies in a homemade teriyaki sauce that caramelizes beautifully during baking, creating that signature glossy finish without the mess of frying.
What sets this recipe apart is the combination of high-heat baking and slow-glazing—a technique I learned from Master Chef Chen that ensures even cooking and maximum flavor penetration.
You'll start with a simple marinade of soy sauce, honey, and garlic, then bake the wings until golden before brushing on the teriyaki sauce for that signature caramelized sheen. The result?
Wings that are crispy on the outside, juicy on the inside, and coated in a sauce that's perfectly balanced between sweet and savory.
By the time these wings emerge from the oven, you'll have glazed caramelized crunch with sticky sweetness that clings to every bite. The sauce isn't just drizzled on top—it's baked into the wings, creating a texture that's both crispy and tender.
This method works beautifully for game day gatherings, weeknight dinners, or whenever you crave wings without the deep-frying hassle. The best part? The teriyaki sauce recipe is included, so you won't need to buy store-bought versions that often fall short.
Serve these wings with a side of sesame seeds, sliced green onions, or a cool cucumber salad to cut through the richness. The flavor profile is bold enough to stand alone but versatile enough to pair with rice or noodles for a complete meal.
Here's how to make them—step by step, just like I do at the Smoky Pig.
Ingredients for baked teriyaki chicken wings
Game day essentials—just 14 ingredients for wings that taste like they came from The Smoky Pig.
| Ingredient | Amount | Notes |
|---|---|---|
| Chicken Wings 🍗 | 2 lb | Split into drumettes and flats |
| Soy Sauce 🥫 | ½ cup | Low-sodium preferred |
| Honey 🍯 | ¼ cup | For natural sweetness |
| Garlic Cloves 🧄 | 4 cloves | Minced for marinade |
| Ginger Root 🌿 | 1 tbsp | Freshly grated |
| Sesame Oil 🫒 | 1 tbsp | For nutty aroma |
| Brown Sugar 🍚 | ¼ cup | Light or dark works |
| Rice Vinegar 🍶 | 1 tbsp | White or seasoned |
| Sesame Seeds 🌰 | 1 tbsp | Toasted for garnish |
| Green Onions 🧅 | 2 whole | Sliced for garnish |
| Olive Oil 🫒 | 1 tbsp | For tossing wings |
| Salt 🧂 | 1 tsp | Kosher or sea salt |
| Black Pepper 🌶️ | ½ tsp | Freshly ground |
| Cornstarch 🌾 | 1 tbsp | For sauce thickening |
The chicken wings are where it all starts. Look for fresh, plump wings at the meat counter—Costco or Whole Foods have the best quality, but any grocery store's fresh section works. Split them into drumettes and flats for even cooking. Pat them dry before tossing with oil; moisture is the enemy of crispiness. I always buy extra because leftovers make killer sandwiches. The soy sauce matters too—low-sodium keeps the flavor balanced without salt overload.
No sesame oil? Toasted peanut oil works in a pinch, though it'll have a different flavor profile. Running short on ginger? Ground ginger at half the amount gets you close. The teriyaki sauce is where the magic happens—honey and brown sugar caramelize beautifully during baking, so don't skip either. For extra depth, add a splash of mirin if you've got it. The cornstarch is key for that glossy finish; mix it with a little cold water before adding to the sauce to avoid clumping. And trust me, toasting the sesame seeds in a dry pan for 30 seconds takes them to another flavor level.
These wings reheat surprisingly well—just toss them in the oven at 375°F for 5-7 minutes until crispy again. Store leftovers in an airtight container for 3 days in the fridge, or freeze for up to 3 months (they're even better the second day). I always make a double batch because they disappear fast. The sauce keeps for 1 week in the fridge, so you can make extra for stir-fries or drizzling over rice.
Why You'll Love This Recipe
- I’ll be real: this recipe is the kind of thing I make when I’ve got better things to do than slave over a stove. Toss the wings in a bowl with soy sauce, honey, minced garlic, and ginger—no chopping, no fuss. Twenty minutes later, you’ve got dinner.
- No-Fuss Prep: I’ll be real: this recipe is the kind of thing I make when I’ve got better things to do than slave over a stove. Toss the wings in a bowl with soy sauce, honey, minced garlic, and ginger—no chopping, no fuss. Twenty minutes later, you’ve got dinner.
- Sweet-Savory Magic: That honey-soy glaze caramelizes into a sticky, glossy finish while the garlic and ginger add warmth. The wings stay juicy inside, crispy out—like someone took all the best parts of takeout and made them better.
- Game for Any Day: Between us, these wings work for everything. Weeknight dinner? Check. Super Bowl snacks? Done. Even my picky teenager devours them straight from the pan. The sauce sticks to everything, so you can serve them with rice, noodles, or just as-is.
Step-by-step instructions for baked teriyaki chicken wings
Crispy wings with glossy teriyaki sauce—ready in one pan with minimal effort.
🔥 Step 1: Prep and Season the Wings
Preheat your oven to 425°F and line a large baking sheet with parchment paper. Split the 2 lb chicken wings into drumettes and flats, discarding any excess fat. In a large bowl, toss the wings with 1 tbsp olive oil, 1 tsp salt, and 0.5 tsp black pepper until evenly coated. Spread them out on the baking sheet in a single layer, leaving space between each piece—they’ll expand as they bake.
Here's the thing—don't crowd the pan. You want that crispy texture, and overcrowding steams the wings instead of browning them. If you're short on space, use two baking sheets. This step sets the foundation for perfect crispiness, so take your time arranging them neatly.
🍳 Step 2: Bake Until Golden and Crispy
Bake the wings for 30 minutes, flipping them halfway through at the 15-minute mark. You're looking for golden brown skin with no pink remaining when you cut into the thickest piece. The wings should feel crispy to the touch, not rubbery or soft.
I know it's tempting to peek early, but resist! Every time you open the oven, you lose heat and moisture. The wings will cook faster uncovered, so let them work their magic. If your oven runs hot, start checking at 25 minutes—every oven behaves differently. The goal is crispy skin with juicy meat inside.
👨🍳 Step 3: Make the Glossy Teriyaki Sauce
While the wings bake, make the sauce. In a small saucepan, combine 0.5 cup soy sauce, 0.25 cup honey, 0.25 cup brown sugar, 1 tbsp rice vinegar, 1 tbsp sesame oil, 4 cloves minced garlic, and 1 tbsp grated ginger root. Bring to a simmer over medium heat, stirring constantly for 5 minutes until the sugar dissolves and the mixture thickens slightly.
Don't walk away—this sauce burns easily. You'll see it bubble gently and reduce slightly, which concentrates the flavors. The sauce should coat the back of a spoon with a glossy sheen. If it's too thick, add 1-2 tablespoons of water to loosen it. This is where the magic happens, so taste it as you go and adjust seasoning if needed.
🥘 Step 4: Glaze and Finish the Wings
Remove the wings from the oven and transfer them to a large bowl. Pour the teriyaki sauce over the wings, tossing gently to coat them evenly. Return the wings to the baking sheet and bake for an additional 5-7 minutes until the sauce caramelizes and the wings are fully glazed. Watch closely—the sauce goes from glossy to caramelized quickly.
Here's a pro tip: If the sauce seems too runny, broil for 1-2 minutes at the end to thicken it up. The wings are done when they're deep golden brown with sticky, glossy sauce clinging to every bite. The sauce should be slightly thick but still coat the wings smoothly.
🍽️ Step 5: Garnish and Serve
Transfer the wings to a serving platter and sprinkle with 1 tbsp toasted sesame seeds and 2 whole sliced green onions. Serve immediately while the sauce is still warm and glossy. The contrast of crispy wings with that sticky, sweet-savory sauce is what makes this recipe a winner.
For extra flavor, drizzle any leftover sauce from the baking sheet over the top. These wings are perfect for game day, weeknight dinners, or whenever you crave something crispy and saucy. Leftovers? Store in an airtight container and reheat in the oven at 350°F for 5-10 minutes to restore crispiness.
Pro Tips For Making Baked Teriyaki Chicken Wings
- Pat wings dry: I learned this the hard way—wet wings steam instead of crisp, and no one wants soggy teriyaki wings. Toss them in paper towels for 10 minutes before baking, and you’ll get that perfect snap every time.
- Bake at 425°F: High heat is non-negotiable here. Start wings at 425°F for the first 20 minutes to render fat and lock in flavor—then drop to 375°F for the glaze. Skimp on the initial heat, and you’ll end up with sticky, undercooked wings.
- Grind ginger fresh: Pre-packaged ginger paste is convenient, but it’s a flavor downgrade. Use a microplane or fine grater for fresh ginger—just 1 teaspoon makes a real difference, and it won’t turn your sauce bitter like overcooked powdered ginger can.
- Brush sauce twice: One coat of teriyaki glaze won’t cut it. After the first 20 minutes of baking, pull the wings and brush them again—this time with a mix of the remaining sauce and a splash of water to keep it sticky. The second coat ensures that caramelized, glossy finish.
Dietary considerations for this baked teriyaki chicken wings
Gluten-Free Adaptation
For a gluten-free version, simply swap the regular soy sauce for a high-quality tamari or gluten-free soy sauce like San-J Tamari. I've tested this exact recipe with tamari and found it delivers the same rich umami flavor without any gluten. Just
Lower-Sugar Options
If you're watching your sugar intake, reduce the honey to 2 tablespoons and the brown sugar to 2 tablespoons while keeping the rest of the sauce ingredients identical. For even more sweetness reduction, I've had great results using monk fruit sweetener (like Lakanto) mixed with a tiny bit of honey—just 1 tablespoon each. The wings still get that caramelized finish, but with significantly less sugar. Taste as you go and adjust to your preference.
Dairy-Free Considerations
This recipe is naturally dairy-free, but if you're serving it alongside dairy-based sides, be mindful of cross-contamination. I recommend using separate utensils and serving dishes to keep everything clean. The teriyaki sauce itself contains no dairy ingredients, so it's safe for most lactose-intolerant individuals.
For extra caution, check your sesame seeds and green onions for potential processing additives, though fresh is always best. 🧀
Spicy Variations
Want to add some heat? Stir 1 teaspoon of gochujang or ½ teaspoon of cayenne pepper directly into the teriyaki sauce before glazing the wings. For a smoky kick, add ½ teaspoon of smoked paprika to the initial wing marinade.
I often make a batch with both—gochujang in the sauce and smoked paprika on the wings—for a perfect balance of sweet, spicy, and smoky flavors. 🌶️
Allergen-Friendly Tips
For nut allergies, skip the sesame oil and sesame seeds, or use sunflower oil instead. If you're avoiding sesame entirely, the wings will still be delicious—just toasted pumpkin seeds make a great crunchy garnish alternative.
For egg allergies, this recipe is completely safe as it contains no egg products. Always double-check your ingredients, especially when substituting oils or seeds, to ensure complete allergen safety.
Protein-Packed Boost
To make these wings even more protein-rich, consider adding 1 tablespoon of nutritional yeast to the teriyaki sauce. It adds a cheesy, umami flavor that complements the sweetness perfectly while boosting the protein content.
I've also had success adding 1 scoop of vanilla whey protein powder (about 30 grams) to the sauce—just mix it in after simmering to avoid clumping. The texture stays smooth, and the flavor is surprisingly good. 💪
Nutrition facts
Frequently asked questions
Can I use frozen chicken wings instead of fresh?
Yes, but thaw them completely first! Place frozen wings in a sealed container and refrigerate for 24 hours or use the quick thaw method: soak in cold water for 30-45 minutes, changing the water every 10 minutes. Pat them completely dry before seasoning—any moisture will prevent crispiness. For extra insurance, broil for 2-3 minutes after glazing to ensure they're fully cooked through.
How do I prevent the wings from sticking to the baking sheet?
Line your baking sheet with parchment paper or use a silicone baking mat. For extra insurance, lightly grease the parchment with 1 tsp olive oil before arranging the wings. I also recommend spacing them out—leave at least 1 inch between each piece. If they still stick, your oven might be too hot; try lowering the temp to 400°F for the initial bake.
What's the best way to reheat leftover teriyaki wings?
Reheat in a 350°F oven for 8-10 minutes on a wire rack over a baking sheet. This restores crispiness better than a microwave. For extra crunch, broil for 1-2 minutes at the end. If using the air fryer, cook at 375°F for 3-4 minutes, shaking halfway. Never reheat in the sauce—it'll make the wings soggy.
Can I make the teriyaki sauce ahead of time?
Make the sauce 1-2 days ahead and store it in an airtight container in the fridge. The flavors deepen over time, and it reheats beautifully. When ready to use, warm it gently on the stove or in the microwave (stirring to prevent clumping). For extra shine, add 1 tsp honey when reheating. The sauce keeps for up to 1 week refrigerated.
Why did my sauce turn out too thick or too thin?
Too thick? Add 1-2 tbsp water and simmer for 1 minute. Too thin? Mix 1 tsp cornstarch with 1 tbsp cold water, stir into the sauce, and simmer for 2 minutes until it thickens. Pro tip: The sauce should coat the back of a spoon but still be pourable. If it's separating, whisk vigorously or blend briefly to recombine.