
Main Courses
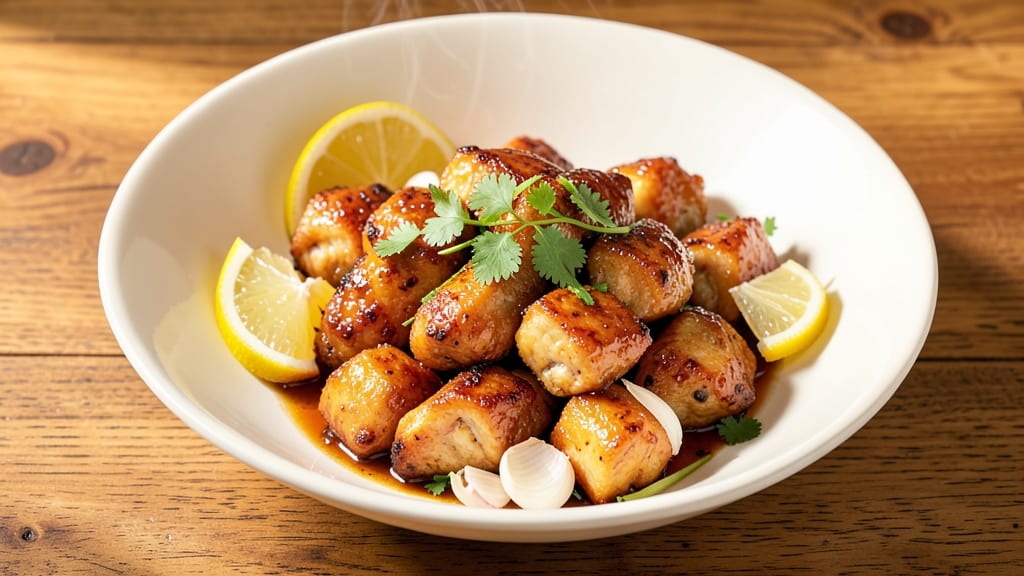
This baked Chinese lemon chicken recipe delivers the perfect balance of crispy edges and tender, juicy meat with a bright citrus kick—all without deep-frying. After years of testing different methods, I've perfected a technique that captures the restaurant-quality flavor while keeping the process simple enough for weeknight dinners.
The secret lies in the marinade: a blend of soy sauce, honey, and lemon that creates a sticky, flavorful crust while keeping the chicken impossibly tender inside.
What makes this recipe truly special is how it transforms ordinary chicken thighs into something extraordinary—crispy on the outside, tender throughout, and bursting with that signature tangy-sweet flavor.
The high-heat baking ensures a golden, crackling crust, while the lemon juice infuses the meat with a refreshing brightness that cuts through the richness. This method also eliminates the mess of deep-frying, making it a foolproof choice for any home cook.
By the time it emerges from the oven, you'll have a dish that's restaurant-worthy but simple enough to make at home. The aroma alone will have everyone gathering around the table, and each bite delivers that perfect combination of textures and flavors.
Serve it with steamed jasmine rice and a side of stir-fried greens for the full Chinese dining experience.
This recipe is designed to be versatile—use it for family dinners, potlucks, or even meal prep. The leftovers reheat beautifully, making it an excellent choice for busy weeks. Let's get started on creating this crispy, tender, and zesty Chinese lemon chicken that will become a new favorite in your household.
Ingredients for baked chinese lemon chicken
Fourteen ingredients transform simple chicken thighs into restaurant-quality crispy-tender perfection with zesty citrus notes.
| Ingredient | Amount | Notes |
|---|---|---|
| Boneless, Skinless Chicken Thighs 🍗 | 1 ½ lb | Cut into even 1-inch pieces |
| All-Purpose Flour 🌾 | ½ cup | For crispy coating |
| Cornstarch 🌾 | ¼ cup | For extra crunch |
| Light Soy Sauce 🥄 | ⅓ cup | Kikkoman preferred |
| Honey 🍯 | ¼ cup | For sticky glaze |
| Fresh Lemon Juice 🍋 | ¼ cup | From 2-3 lemons |
| Garlic Cloves 🧄 | 4 cloves | Minced for marinade |
| Ginger Root 🌿 | 1 tbsp | Freshly grated |
| Sesame Oil 🫒 | 1 tbsp | For aroma |
| Vegetable Oil 🫒 | 2 tbsp | For tossing |
| Salt 🧂 | 1 tsp | Diamond Crystal preferred |
| Black Pepper 🌶️ | ½ tsp | Freshly cracked |
| White Pepper 🌶️ | ¼ tsp | For subtle heat |
| Green Onions 🧅 | 2 whole | Sliced for garnish |
The chicken thighs are the foundation—look for bone-in, skin-on pieces for maximum flavor and moisture retention, though boneless works too. Kroger or local butchers often carry the best quality at reasonable prices. If using frozen, thaw overnight in the fridge for even cooking. The lemon juice should be freshly squeezed for maximum brightness; bottled juice lacks the same depth of flavor. For the soy sauce, Kikkoman or Pearl River Bridge brands deliver that authentic umami punch without overpowering the citrus. The honey should be pure, with no added corn syrup—local honey adds subtle floral notes that complement the dish beautifully.
No cornstarch? Substitute arrowroot powder at the same amount—it creates a similar crispy texture. Running out of sesame oil? A tiny splash of toasted sesame seeds adds the same nutty aroma. The ginger and garlic can be swapped for 1 tbsp each of ginger paste and garlic powder if fresh isn't available. For a sweeter glaze, increase honey to 3 tbsp and reduce soy sauce slightly. The green onions are optional but add that final pop of freshness—substitute 1 tbsp chopped cilantro if preferred. The flour-cornstarch mix is non-negotiable for that signature crunch; panko breadcrumbs can replace half if you're feeling adventurous.
Marinate the chicken for at least 2 hours (overnight is ideal) to maximize flavor infusion. Store leftovers in an airtight container for up to 4 days—they reheat beautifully in a 350°F oven for 10 minutes. For meal prep, portion into single-serving containers with a side of jasmine rice. The marinade can be made 3 days ahead and stored in the fridge; stir before using. Freeze any unused marinade for up to 3 months—perfect for quick weeknight dinners. The crispy coating loses its crunch when reheated, so enjoy fresh or save portions for cold salads.
Why You'll Love This Recipe
- No-Fuss Coating: I swear by the flour-cornstarch mix—just toss the thighs in that dry blend, no measuring cups, no stress. The cornstarch gives it that perfect crispy crust without needing a deep fryer or extra bowls.
- Sweet-Savory Magic: That honey-soy glaze? It’s the star. The soy brings the umami depth while the honey caramelizes into a sticky, slightly tangy finish—like a hug for your taste buds in every bite.
- Lunchbox Hero: Between us, this is my go-to for meal prep. Bake a big batch, slice it up, and it stays crispy for days. Toss it in wraps, over rice, or straight from the fridge—still tastes fresh.
- Budget Crispy Victory: Chicken thighs are cheaper than breasts, and this recipe stretches further. Plus, the ingredients are pantry staples—no specialty items, no markup. Good food shouldn’t break the bank.
Step-by-step instructions for baked Chinese lemon chicken
This method delivers perfectly crispy, tender chicken with a sticky-sweet glaze every time.
Prepare the Chicken and Marinade
Cut the 1.5 lb boneless, skinless chicken thighs into even 1-inch pieces using a sharp knife. This size ensures uniform cooking and maximum crispiness. In a large bowl, whisk together the 0.33 cup light soy sauce, 0.25 cup honey, 0.25 cup fresh lemon juice, 4 cloves minced garlic, 1 tbsp freshly grated ginger root, 1 tbsp sesame oil, 1 tsp salt, 0.5 tsp black pepper, and 0.25 tsp white pepper. The marinade should be thick and aromatic—this balance of sweet, tangy, and savory flavors is what makes this dish shine.
Add the chicken pieces to the marinade and toss gently to coat evenly. Let the mixture sit at room temperature for 15 minutes while you prepare the coating. This brief marinating time ensures the chicken absorbs enough flavor without becoming mushy. The lemon juice will begin to tenderize the meat slightly, while the soy sauce and honey create that signature sticky glaze.
Create the Crispy Coating
In a separate bowl, combine the 0.5 cup all-purpose flour and 0.25 cup cornstarch. This blend creates a lighter, crispier coating than flour alone. Add the chicken pieces from the marinade, one at a time, and toss gently to ensure each piece is fully coated. The cornstarch helps achieve that satisfying crunch while maintaining tenderness inside.
Transfer the coated chicken to a plate and let it rest for 5 minutes. This brief resting period allows the coating to adhere more firmly to the chicken, preventing it from falling off during baking. The coating should look dry and evenly distributed—this is your guarantee of crispy perfection when baked.
Bake to Golden Perfection
Preheat your oven to 400°F and line a baking sheet with parchment paper. Arrange the coated chicken pieces in a single layer on the prepared sheet, leaving about 1 inch between each piece. This spacing ensures even browning and crisping. Drizzle the 2 tbsp vegetable oil evenly over the chicken, then toss gently to coat the pieces lightly with oil. The oil helps create a deeper golden color and enhances the crispiness of the coating.
Bake for 25-30 minutes, flipping the chicken pieces halfway through the cooking time at the 15-minute mark. You'll know they're done when the coating is deep golden brown and the chicken reaches an internal temperature of 165°F. The edges should be crispy, while the meat remains juicy and tender. If the coating starts browning too quickly, tent the baking sheet loosely with foil to prevent burning while still allowing the chicken to cook through.
Rest and Serve
Remove the chicken from the oven and let it rest on the baking sheet for 5 minutes. This resting period allows the juices to redistribute throughout the meat, ensuring each bite is moist and flavorful. The coating will remain crispy, while the chicken stays tender—this is the perfect balance we're aiming for.
Garnish each serving with 2 sliced green onions for a fresh, bright finish. Serve immediately while the coating is still crispy. The combination of the sticky-sweet glaze, crispy coating, and tender chicken creates a dish that's both comforting and exciting. The lemon and ginger flavors cut through the richness, making each bite balanced and refreshing.
Pro Tips For Making Baked Chinese Lemon Chicken
- Prep Chicken Like This: Pat the thighs bone-dry with paper towels before dredging—no wet spots. I used to skip this, and the coating would clump like sad dumplings. Also, cut them into even 1.5-inch chunks so they bake uniformly.
- Mix Dry Ingredients First: Whisk flour and cornstarch together before adding wet ingredients—this prevents lumps in your glaze. I learned this after slathering honey-soy sauce on clumpy flour and ending up with a sticky mess instead of a glossy crust.
- Bake at 375°F, Not Higher: The oven should be preheated to 375°F, not cranked to 400°F. High heat burns the honey before the chicken cooks through, leaving you with caramelized edges and raw centers. Trust me, 375°F is the sweet spot.
- Rest Before Baking: Let the coated chicken sit uncovered on a rack for 10 minutes after dredging. This lets excess moisture evaporate so the crust crisps instead of steaming into a sad, limp coating. (Yes, even if you’re impatient like me.)
Troubleshooting this recipe
Undercooked Chicken
If your chicken emerges from the oven still rubbery or pale inside, it likely didn't reach the proper 165°F internal temperature. I've found that using a meat thermometer is non-negotiable—insert it into the thickest piece to avoid false readings.
For thicker cuts, extend baking time by 5-10 minutes and check again. Remember, chicken continues cooking slightly after removal from the oven, so pull it out when it hits 160°F—it'll climb to 165°F while resting. 🌡️
Soggy Coating
The dreaded soggy coating happens when moisture escapes the chicken too quickly during baking. To prevent this, I swear by patting the chicken pieces completely dry with paper towels before coating. Also, make sure your oven rack is positioned in the middle of the oven for even heat circulation.
If your kitchen gets humid, bake with a silicon baking mat instead of parchment—it wicks away excess moisture better. The cornstarch in the coating needs a dry environment to crisp properly.
Uneven Browning
When one side of your chicken browns beautifully while the other stays pale, it's usually a heat distribution issue. Rotate your baking sheet halfway through cooking, and consider using a dark-colored baking sheet—they conduct heat more efficiently.
For extreme cases, I've found that placing a small baking stone on the lower rack helps create more even heat. If your oven has hot spots, rearrange pieces every 10 minutes during the final baking phase.
Excessive Stickiness
If your chicken comes out gloppy rather than crispy, the honey in the marinade might be overpowering. Try reducing honey to 2 tbsp and adding 1 tbsp rice vinegar to balance the sweetness. Also, make sure you're not overcrowding the baking sheet—pieces should have at least 1 inch between them.
For extra crispiness, broil for 1-2 minutes at the very end of cooking, watching closely to avoid burning.
Dry Chicken
Overcooking is the main culprit for dry chicken. Since we're baking at 400°F, the high heat can dry out the meat quickly. To combat this, I recommend using slightly larger chicken pieces (1.25 inches thick) that cook more evenly.
Also, don't skip the 5-minute rest after baking—this crucial step allows juices to redistribute. For extra moisture, add 1 tbsp chicken broth to the marinade, or baste the chicken with a little extra marinade halfway through baking.
Marinade Not Sticking
If your chicken pieces look dry after marinating, the marinade might not have enough acidity to break down the meat fibers. Boost the lemon juice to 3 tbsp and add 1 tsp baking soda to the marinade—this helps tenderize the chicken.
Also, make sure your chicken pieces are evenly sized so they absorb the marinade consistently. For stubborn pieces, poke them lightly with a fork before adding to the marinade to create small channels for flavor penetration. 💡
Nutrition facts
Frequently asked questions
Can I use chicken breast instead of thighs?
Chicken breast works but requires extra care to prevent dryness. Use 1-inch thick pieces and reduce baking time to 20-25 minutes. For best results, marinate for 4-6 hours and add 1 tbsp chicken broth to the marinade. The breast benefits from the lemon's acidity but needs more protection against drying out.
What's the best way to reheat leftovers?
Reheat in a 350°F oven for 10 minutes on a wire rack to maintain crispiness. Avoid microwaving—it turns the coating soggy. For extra crunch, broil for 1-2 minutes after reheating. Store leftovers in an airtight container for up to 4 days. The coating loses crispness after reheating, so enjoy fresh when possible.
Can I make this gluten-free?
Replace the flour and cornstarch with 0.75 cup gluten-free all-purpose flour and 0.25 cup tapioca starch. The tapioca creates the same crispy texture while keeping it gluten-free. Make sure all other ingredients (soy sauce, etc.) are certified gluten-free. The flavor remains identical—just the texture stays crispy.
How do I adjust the recipe for a larger group?
Double all ingredients for 8 servings, but use two baking sheets to maintain even cooking. Increase oven temperature to 425°F and reduce baking time to 20-25 minutes. Cook in batches if needed—this keeps the coating crispy. For 12 servings, triple the recipe and use three baking sheets. The lemon flavor holds up beautifully in larger batches.
What sides pair best with this dish?
Steamed jasmine rice soaks up the sticky glaze beautifully. For a complete meal, add stir-fried bok choy or cucumber salad with sesame dressing. The crispy chicken also pairs well with egg fried rice or mandarin orange salad for a refreshing contrast. The bright citrus flavors in the chicken complement these sides perfectly.