
Main Courses
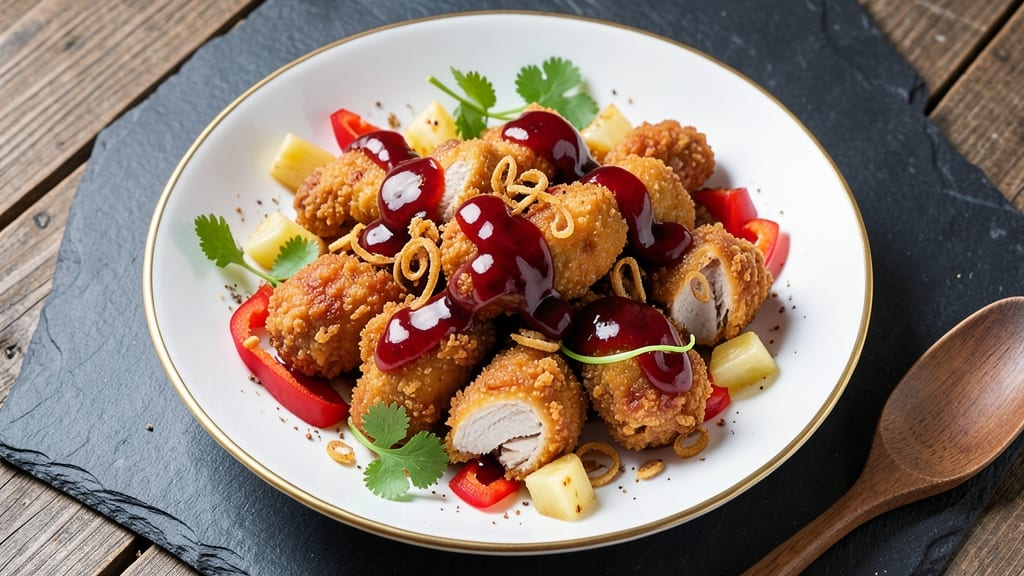
This authentic Chinese sweet and sour chicken delivers the exact balance of crispy batter, tangy sauce, and fresh vegetables that makes it a restaurant favorite.
I first learned this recipe from my grandmother's handwritten notes, where she emphasized the importance of a proper batter and sauce reduction—details that make all the difference. The secret lies in the double-frying technique that creates that signature crunch, paired with a sauce that's sweet, tangy, and just slightly spicy.
What sets this recipe apart is the authentic approach: no shortcuts in the batter (cornstarch is key for that crispy texture), no rushed sauce (it needs to reduce properly), and no substitutions for the fresh pineapple and bell peppers that add brightness and crunch.
The chicken pieces stay tender while developing a golden-brown crust, and the sauce clings perfectly to each bite. This is the version that actually tastes like your favorite takeout—just better.
By the time you're done, you'll have a plate that looks and tastes like it came from a bustling Cantonese restaurant: crispy golden chicken pieces, vibrant red sauce, fresh pineapple chunks, and crunchy bell peppers.
The aroma alone will have everyone gathering around the table. The best part? It's easier to make at home than you might think, once you know the right techniques.
Serve with steamed jasmine rice to soak up every last bit of that tangy-sweet sauce. The leftovers reheat beautifully too, making this a perfect meal for busy weeknights or family gatherings. Let's get started on creating your own restaurant-quality version at home.
Ingredients for authentic chinese sweet and sour chicken
Crispy chicken, tangy sauce, and vibrant veggies—this is the perfect balance for authentic Chinese takeout at home.
| Ingredient | Amount | Notes |
|---|---|---|
| Boneless Chicken Thighs 🍗 | 1 ½ lb | Cut into 1-inch pieces |
| All-Purpose Flour 🌾 | 1 cup | For light, crispy batter |
| Cornstarch 🌾 | ½ cup | Essential for extra crispiness |
| Baking Powder 🧂 | 1 tsp | For lighter batter |
| Salt 🧂 | ½ tsp | Kosher or sea salt |
| Black Pepper 🌶️ | ¼ tsp | Freshly ground preferred |
| Large Eggs 🥚 | 1 whole | Beaten for batter |
| Vegetable Oil 🫒 | 2 cups | For double-frying |
| Fresh Pineapple 🍍 | 1 cup | Diced, fresh preferred |
| Red Bell Peppers 🌶️ | 1 whole | Diced, any color works |
| Garlic Cloves 🧄 | 4 cloves | Minced for sauce |
| Ketchup 🍅 | ½ cup | High-quality preferred |
| Rice Vinegar 💧 | ¼ cup | White or seasoned |
| Soy Sauce 🍶 | ¼ cup | Light or all-purpose |
| Brown Sugar 🍚 | ¼ cup | Packed, for sauce |
| Red Food Coloring 🎨 | ½ tsp | Optional for vibrant color |
| Green Onions 🧅 | 3 whole | Sliced for garnish |
The chicken thighs are non-negotiable here—they stay juicy while developing that signature crispy crust. Look for bone-in, skin-on thighs at Asian markets or Whole Foods for the best marbling and flavor. Cut them into even 1-inch pieces so they cook uniformly. The batter needs to be light and crispy, which is why cornstarch is essential—it gives that signature restaurant texture. If you can't find cornstarch, arrowroot powder works too, but it won't be quite the same. For the sauce, Kikkoman ketchup is my go-to, but any good-quality brand works. The rice vinegar should smell fresh and slightly tangy—if it's dull, it's past its prime.
No fresh pineapple? Canned pineapple in juice works perfectly, just drain it well. The bell peppers can be any color—red, yellow, or green—but red gives that classic sweet-and-sour look. For the sauce, if you're skipping the food coloring, add a pinch of paprika for color. The brown sugar should be packed—don't scoop it loosely. Want more heat? Add a dash of chili oil or a pinch of cayenne to the sauce. The double-frying technique is key: fry the chicken once to cook through, then again to get that golden crisp. Don't skip the second fry—it makes all the difference.
The batter and sauce can be prepped ahead—store them separately in the fridge for up to 2 days. The chicken pieces stay crispy for about 2 hours at room temperature, so serve them fresh. The sauce reheats beautifully, so you can make extra for leftovers. Portion the sauce into small containers if you're freezing—it thickens when thawed. Garnish with those fresh green onions right before serving—they add a bright pop of color and freshness. This dish tastes even better the next day, so plan to make it when you can enjoy leftovers.
Why You'll Love This Recipe
- Here’s what sold me: the crispy batter meets that glossy, slightly sticky sauce. The vinegar and sugar balance is chef’s kiss—sharp enough to cut through the richness, but sweet enough to make you crave another bite. (Yes, even on a Tuesday night.)
- One-Pan Magic: I swear by this trick—just toss the chicken thighs in the flour-cornstarch mix (that baking powder’s secret weapon for extra lift), fry them golden, and boom. No extra pans, no mess. The cornstarch gives that signature crunch without the fuss of double-dredging.
- Tangy Crunch Perfection: Here’s what sold me: the crispy batter meets that glossy, slightly sticky sauce. The vinegar and sugar balance is chef’s kiss—sharp enough to cut through the richness, but sweet enough to make you crave another bite. (Yes, even on a Tuesday night.)
- Lunchbox Hero: Between us, this keeps perfectly for days. Pack the leftovers in containers—it’s my go-to for work lunches or kids’ school meals. The sauce clings to the chicken, so no soggy paper towels. My daughter picks out the bell peppers, but still asks for seconds.
Step-by-step instructions for authentic Chinese sweet and sour chicken
Here's how to create restaurant-quality sweet and sour chicken with crispy batter and tangy sauce.
Prepare the Chicken and Batter Mixture
Cut the 1.5 lb boneless chicken thighs into 1-inch pieces and pat them completely dry with paper towels. This step is crucial for creating a crispy batter—any moisture will prevent proper adhesion and crispiness. In a large bowl, whisk together the 1 cup all-purpose flour, 0.5 cup cornstarch, 1 tsp baking powder, 0.5 tsp salt, and 0.25 tsp black pepper. The cornstarch gives that signature extra crunch, while the baking powder helps lighten the batter.
In a separate bowl, beat the 1 whole large egg until just combined. Pour the beaten egg into the dry ingredients and mix with a wooden spoon or silicone spatula until you have a smooth, thick batter that coats the back of the spoon. The batter should be thick enough to cling to the chicken pieces but still flow smoothly. If it's too thick, add 1-2 tablespoons of water to loosen it. Let the batter rest for 5 minutes while you prepare the frying setup.
Double-Fry for Maximum Crispiness
Heat 1 cup of the vegetable oil in a deep skillet or wok over medium heat until it reaches 325°F—this is the first frying temperature. You'll need a thermometer for accuracy, as the oil should not smoke. Working in batches to avoid overcrowding, carefully add the chicken pieces to the hot oil and fry for 3-4 minutes until they're lightly golden. The pieces should float to the surface when properly cooked. Use a slotted spoon to transfer them to a paper towel-lined plate to drain.
Increase the oil temperature to 375°F for the second fry. Working quickly, return the fried chicken to the skillet and fry for another 2-3 minutes until they're a deep, golden brown. This second fry is what creates that perfect crispy texture we're after. Transfer the chicken to a clean plate and keep it warm while you prepare the sauce. If the oil starts to smoke excessively, reduce the heat slightly to maintain control.
Create the Tangy Sweet and Sour Sauce
In a medium saucepan, combine the 0.5 cup ketchup, 0.25 cup rice vinegar, 0.25 cup soy sauce, 0.25 cup packed brown sugar, 4 minced garlic cloves, 1 cup diced fresh pineapple, and 1 diced red bell pepper. Bring the mixture to a gentle simmer over medium heat, stirring occasionally to prevent sticking. The sauce should bubble softly but not boil vigorously—this helps develop the flavors without burning the sugar.
Add the 0.5 tsp red food coloring (if using) and stir until fully dissolved. Simmer for 8-10 minutes until the sauce thickens slightly and the pineapple begins to soften. Taste and adjust the balance—you want a perfect harmony of sweet, sour, and savory. If it needs more tang, add a splash of rice vinegar; if it needs more sweetness, add a bit more brown sugar. The sauce should coat the back of a spoon but still flow smoothly.
Combine and Serve with Fresh Garnish
Return the crispy chicken to the saucepan with the simmering mixture and gently toss to coat evenly. Let it cook for 2-3 minutes until the chicken absorbs the flavors and the sauce becomes glossy. The chicken should be fully coated in the vibrant sauce, with no dry spots remaining. If the sauce seems too thin, let it simmer uncovered for another minute to reduce slightly.
Transfer the sweet and sour chicken to a serving platter and garnish with the 3 sliced green onions. The contrast of the fresh green against the red sauce adds a beautiful visual finish. Serve immediately while the chicken is crispy and the sauce is warm. For an authentic touch, pair with steamed jasmine rice or egg fried rice to soak up every last bit of that tangy, sweet sauce.
Pro Tips For Making Authentic Chinese Sweet And Sour Chicken
- Fry in batches: I learned this the hard way—crowding the pan turns your golden crust into a soggy mess. Use about 2 tablespoons of oil per batch (enough to coat the bottom) and let the chicken sizzle undisturbed for 3-4 minutes on each side. The oil should be hot enough to smoke slightly when you add the first piece—yes, even if you're impatient like me.
- Mix baking powder last: The flour-cornstarch mix needs baking powder, but add it after coating the chicken. Sprinkle it directly over the pieces in the bowl, then toss gently—this keeps the coating light and crispy, not dense. I used to mix it in first, and the result was always heavier, like fried dumplings instead of tender chicken.
- Dry the chicken thoroughly: Pat those thighs completely dry before dredging—wet spots mean uneven cooking and a sad, lumpy crust. Use paper towels and press firmly, especially around the edges. I skip this sometimes, and the difference in texture is noticeable—your future self will thank you.
- Save the starchy water: After boiling the pineapple or bell peppers for the sauce, don’t pour out that starchy water. Strain it and add it back to the sauce—it thickens the glaze naturally and gives it that authentic, glossy finish. I was skeptical until I tried it; now I save it religiously.
Common mistakes when making perfect results
Batter Too Thick
If your batter feels like glue and won't coat the chicken properly, you've likely added too much flour or cornstarch. I've made this mistake more times than I can count—especially when I get nervous about the texture.
The fix is simple: add 1 tablespoon of water at a time until it reaches a thick but pourable consistency. Think of it like pancake batter—it should cling to the back of a spoon but still flow smoothly.
Remember, the batter needs to be thick enough to create that signature crispy crust, but not so thick that it falls off the chicken during frying. 🥄
Oil Too Hot
Frying at too high a temperature will burn the outside of your chicken before the inside cooks through, leaving you with a bitter, charred mess. I learned this the hard way when I cranked the heat too high during my first attempt.
Keep the oil at 325°F for the first fry and 375°F for the second. Use a thermometer—don't guess! If the oil starts smoking excessively, reduce the heat immediately. The chicken should sizzle gently, not roar. Patience here is key to that perfect golden-brown finish. 🔥
Skipping the Double-Fry
This is a common shortcut that ruins the texture. Single-frying leaves your chicken soggy and undercooked, while double-frying creates that restaurant-quality crispiness. The first fry cooks the chicken through, and the second fry at a higher temperature creates that irresistible crunch.
I've tried skipping it, and trust me, the difference is night and day. If you're worried about extra oil, use a thermometer to ensure you're using the right amount—you don't need much for both fries. 🍗
Overcrowding the Pan
When you crowd the pan with too many chicken pieces, the oil temperature drops, leading to greasy, uneven cooking. I once tried to fry all the chicken at once, and the result was a sad, greasy pile.
Work in batches—no more than 4-5 pieces at a time—to maintain the proper oil temperature. This ensures each piece gets that perfect golden-brown crust. If you're using a wok, give yourself plenty of space between pieces. 🥘
Sauce Too Thin
A watery sauce won't cling to the chicken or deliver that signature tangy-sweet flavor. If your sauce isn't thickening as it simmers, you might have used too much liquid or not reduced it enough. Let it simmer uncovered for an extra 2-3 minutes to evaporate excess moisture.
If it's still too thin, mix 1 teaspoon of cornstarch with 1 tablespoon of water, stir it in, and let it thicken. Taste as you go—you want a sauce that coats the back of a spoon but still flows smoothly. 🍶
Not Resting the Batter
Letting the batter rest for 5 minutes before dipping the chicken is crucial—it allows the flour and cornstarch to fully hydrate and creates a smoother, more stable coating. I used to skip this step out of impatience, and the batter would clump and fall off during frying.
Give it that short rest, and you'll notice a huge difference in the final texture. Think of it like letting your dough rise—patience pays off! 🕒
Nutrition facts
Frequently asked questions
Can I use chicken breast instead of thighs?
Thighs are ideal because they stay juicy while developing that crispy crust, but you can use boneless, skinless breasts if needed. Pound them to ¼-inch thickness and pat them very dry to prevent sogginess. Fry for 2-3 minutes less per side since breasts cook faster. The texture won't be quite as tender, but it'll still taste delicious!
What if I don't have cornstarch?
Cornstarch creates that signature crispy texture, but you can substitute with ½ cup arrowroot powder or even ½ cup all-purpose flour as a pinch-hit. The batter will be slightly less crispy, but still tasty. For extra crunch, add 1 tablespoon baking powder to help lighten the texture. The sauce won't be affected at all.
How do I make this vegetarian?
Swap the chicken for 1 lb firm tofu or extra-firm tofu cubes (pressed and dried). Cut the tofu into similar-sized pieces and coat them in the same batter. Fry using the double-fry method—just reduce the first fry to 2-3 minutes since tofu cooks faster. The sauce and veggies stay exactly the same. For extra protein, add ½ cup chickpeas to the sauce.
Can I make the sauce ahead of time?
The sauce actually tastes better the next day as the flavors meld. Make it up to 2 days ahead and store it in an airtight container in the fridge. Reheat it gently over low heat, stirring constantly until warmed through. If it thickens too much, add 1-2 tablespoons of water to loosen it. The chicken batter is best made fresh, but you can prep the dry ingredients ahead.
Why does my sauce look pale?
The vibrant red color comes from the ketchup and optional food coloring. If your sauce looks pale, add ½ teaspoon more red food coloring or stir in 1 teaspoon paprika for color. For extra tang, add 1 tablespoon more rice vinegar. The flavor won't be affected, but the visual appeal will improve dramatically. Think of it like adding a splash of color to your favorite cocktail!