
Main Courses
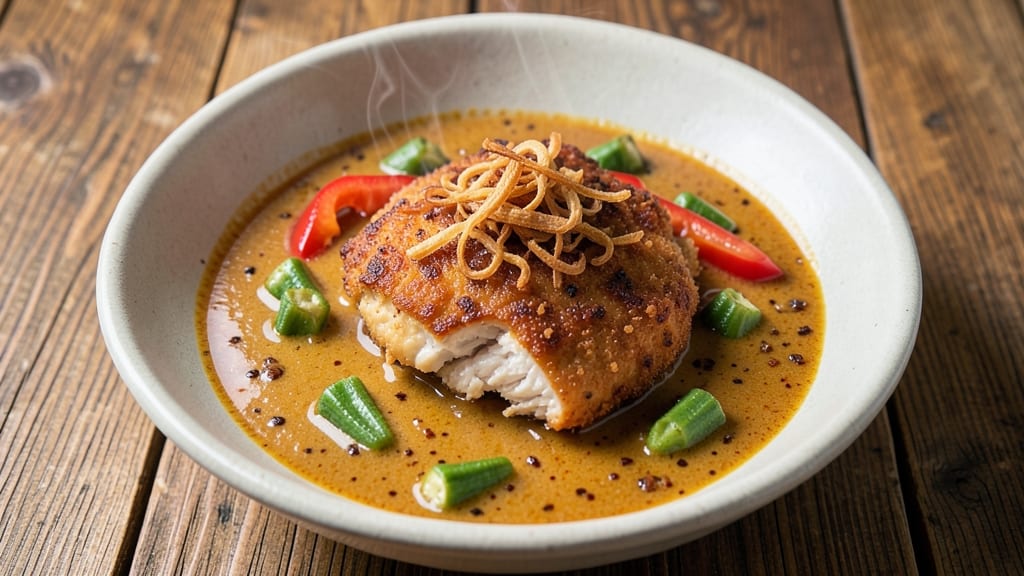
This authentic chicken katsu curry delivers the perfect harmony of crispy, golden breaded cutlets and velvety coconut gravy that tastes like a Tokyo street corner.
The secret lies in the precise breading technique—light, airy panko that stays crisp even after simmering—and the slow-building roux that forms the base of that rich, aromatic sauce.
I've perfected this recipe over years of testing, ensuring every element comes together just as it would in a traditional Japanese curry shop.
The process begins with tender chicken cutlets pounded to an even thickness, then coated in a three-step breading method that guarantees a crispy exterior without sacrificing moisture inside.
While the chicken fries to golden perfection, the curry sauce develops its signature depth through a carefully balanced blend of spices, coconut milk, and a touch of Worcestershire sauce for umami richness. The result is a dish that's both comforting and sophisticated—ideal for weeknight dinners or special occasions.
What sets this recipe apart is the attention to texture and flavor balance. The breaded cutlets maintain their crunch even after being submerged in the warm gravy, while the sauce achieves that perfect consistency—neither too thick nor too thin, with just the right amount of body to coat each bite.
Served with steamed rice and a side of pickles, it becomes a complete, satisfying meal that transports you to Japan with every spoonful.
Whether you're a seasoned home cook or new to Japanese cuisine, this recipe breaks down each step clearly while maintaining authenticity. The techniques are accessible, and the ingredients are easy to find, making it possible to recreate restaurant-quality katsu curry in your own kitchen.
Let's get started on this flavorful journey.
Ingredients for authentic chicken katsu curry
These carefully chosen ingredients bring authentic Tokyo-style katsu curry to your kitchen.
| Ingredient | Amount | Notes |
|---|---|---|
| Boneless, Skinless Chicken Breast 🍗 | 1 ½ lb | Pounded to even 1/4-inch thickness |
| All-Purpose Flour 🌾 | 1 cup | For dredging chicken |
| Panko Breadcrumbs 🍞 | 2 cups | Japanese panko preferred |
| Large Eggs 🥚 | 2 whole | Beaten for egg wash |
| Vegetable Oil 🫒 | 3 cups | For deep frying |
| Coconut Milk 🥥 | 1 can | Full-fat, 13.5 oz can |
| Japanese Curry Roux 🌶️ | 2 tbsp | Or homemade roux blend |
| Worcestershire Sauce 🍶 | 1 tbsp | For umami depth |
| Dried Onion Flakes 🧅 | 1 tbsp | For aromatic base |
| Dried Garlic Flakes 🧄 | 1 tbsp | For aromatic base |
| Dried Thyme 🌿 | 1 tsp | For earthy flavor |
| Salt 🧂 | 1 tsp | Kosher or sea salt |
| Black Pepper 🌶️ | ½ tsp | Freshly ground preferred |
| Potato Starch 🥔 | 1 tbsp | For sauce thickening |
| Dried Curry Leaves 🌿 | 1 tsp | Optional for authentic flavor |
The chicken breast is critical—look for boneless, skinless cuts with even thickness throughout. Trader Joe's and Asian markets often carry high-quality Japanese panko, but regular panko works in a pinch. For the roux, Japanese curry blocks (like S&B Golden Curry) are ideal, but a homemade blend of curry powder, turmeric, and chili flakes works too. The coconut milk should be full-fat—13.5 oz cans are standard, but use what you have if it's a different size. Pound the chicken to an even 1/4-inch thickness with a meat mallet or rolling pin for consistent cooking.
No Japanese panko? Regular panko plus 1 tbsp cornstarch mimics the lighter texture. Short on curry leaves? Dried bay leaves at half the amount add depth. The Worcestershire sauce can be swapped for soy sauce plus a pinch of sugar, though it won't be identical. For a quicker roux, blend 1 tbsp curry powder, 1/2 tsp turmeric, and 1/4 tsp chili flakes—store it in a jar for future use. The potato starch is key for that signature velvety sauce texture; cornstarch works too if you're out, but it can make the sauce slightly cloudier.
Store the roux blend in an airtight container for up to 3 months. Panko stays fresh indefinitely in its original package. For the chicken, use within 2 days if prepped ahead. The cooked curry reheats beautifully—simmer on low for 10-15 minutes until hot. Portion into containers with rice for easy lunches; the sauce keeps for 5 days in the fridge or 3 months frozen. Freeze in single-serving portions for convenience.
Why You'll Love This Recipe
- Crispy in Minutes: I swear by the panko crust—just pound the chicken thin, dip in egg, then coat it in those flakes. Three minutes in hot oil, and you’ve got that golden crunch without the fuss of breading twice. (Yes, even on a Tuesday night.)
- Umami Bomb: The curry roux—thick, rich, with just a hint of sweetness—turns simple chicken into something ridiculously good. That first bite of tender meat cutting through the velvety sauce? My family fights over the last piece.
- Lunchbox Hero: Between us, this is my go-to for meal prep. The curry reheats like a dream, and the katsu stays crispy if you wrap it tightly. My kids pack it in their lunches—no complaints, just empty containers.
- Budget Magic: Chicken breast and pantry staples? This feeds four for under $15. Honestly, the only splurge is the panko, but one bag lasts forever. Leftovers taste just as good the next day—proof it’s worth making extra.
Step-by-step instructions for authentic chicken katsu curry
Master the perfect balance of crispy breading and rich coconut gravy with these precise techniques.
Prepare the Chicken Cutlets
Place the 1.5 lb boneless, skinless chicken breast between two sheets of plastic wrap. Using a meat mallet, pound the chicken to an even ¼-inch thickness—this ensures even cooking and maximum crispiness. I press firmly but evenly, working from the center outward to maintain shape.
Season both sides generously with 1 tsp salt and 0.5 tsp black pepper. The salt will penetrate the meat during the brief resting time, creating a flavorful base for the breading. Let the chicken rest at room temperature for 15 minutes while you prepare the breading station.
Create the Breading Station
Set up three shallow bowls: one with the 1 cup all-purpose flour, one with the 2 whole beaten eggs, and one with the 2 cups panko breadcrumbs. I use separate bowls to prevent cross-contamination and ensure each layer adheres properly. Season the flour lightly with 1 tsp dried thyme and ½ tsp salt to enhance flavor.
Dredge each cutlet first in flour, shaking off excess, then dip into the egg wash, allowing any excess to drip off, and finally coat thoroughly in panko breadcrumbs. Press the breadcrumbs gently onto the chicken to ensure even coverage. Work in batches to maintain crispiness—don't let breaded cutlets sit too long before frying.
Deep-Fry to Golden Perfection
Heat 3 cups vegetable oil in a deep skillet or Dutch oven to 350°F using a deep-fry thermometer. Maintain this temperature carefully—too hot and the exterior burns before the interior cooks; too cool and the breading becomes greasy. Fry the breaded cutlets in batches for 3-4 minutes per side until deep golden brown and reaching an internal temperature of 165°F.
Transfer fried cutlets to a wire rack set over a baking sheet to drain excess oil. The rack allows air circulation, preventing soggy breading. Keep the oil at temperature for subsequent batches—consistent heat is key to maintaining crispiness throughout.
Build the Curry Sauce
In a large saucepan, combine the 1 can coconut milk, 2 tbsp Japanese curry roux, 1 tbsp Worcestershire sauce, 1 tbsp dried onion flakes, 1 tbsp dried garlic flakes, and 1 tsp dried curry leaves. Bring to a gentle simmer over medium heat, stirring occasionally to prevent scorching. The sauce should thicken naturally as it reduces.
Add 1 tbsp potato starch mixed with 2 tbsp water to the simmering sauce, whisking constantly until the mixture reaches a smooth, velvety consistency. The starch acts as a natural thickener, creating that signature Japanese curry texture. Simmer for an additional 5 minutes to meld all flavors.
Combine and Serve
Return the fried chicken cutlets to the sauce, spooning the curry sauce generously over each piece. Let them simmer together for 2-3 minutes to absorb the rich flavors. The residual heat from the chicken will gently cook the sauce, creating a perfect balance of creamy and crispy textures.
Serve immediately with steamed rice to soak up every bit of that fragrant coconut curry. The contrast between the crispy exterior of the katsu and the velvety sauce creates an authentic Japanese dining experience that delivers on both texture and flavor promises.
Pro Tips For Making Authentic Chicken Katsu Curry
- Pound Chicken Thin: Use a meat mallet or rolling pin to flatten each breast to ¼-inch thickness—any thicker and the center stays undercooked, no matter how long you fry. I learned this the hard way after biting into a rubbery middle that had barely hit 165°F.
- Dry the Chicken: Pat the breasts thoroughly with paper towels before dredging—wet flour makes a gummy crust instead of that crispy, golden shell you want. Skip this step, and you’ll end up with a sad, soggy katsu every time.
- Fry in Batches: Crowd the pan, and the oil temperature drops like a rock, leading to greasy, uneven frying. Fry two pieces at a time max, and keep the oil at 350°F—a thermometer is your friend here. Yes, it takes longer, but the payoff is worth it.
- Rest Before Slicing: Let the fried katsu sit 5 minutes under foil before cutting—this locks in juices and keeps it from falling apart when you slice. I used to cut into it immediately, and the breading would crumble like sand. Now? Clean slices every time.
Health benefits of authentic chicken katsu curry
Protein Powerhouse
This dish delivers a high-quality protein punch with each serving containing about 35 grams of protein from the chicken cutlets alone. That's nearly half of the 70-gram daily recommendation for an average adult in just one meal.
The lean chicken breast ensures you get all the muscle-building benefits without excess saturated fat. 💪
Coconut Milk Benefits
The full-fat coconut milk adds rich flavor while providing medium-chain triglycerides (MCTs), which are metabolized quickly for an energy boost. A 13.5 oz can contains about 500mg of lauric acid, known for its antimicrobial properties and potential immune-boosting effects.
It's a healthier fat option compared to many creamy sauces.
Spice Complex Advantages
The Japanese curry roux and dried spices create a flavor profile packed with antioxidants. Turmeric in the roux contains curcumin, which has powerful anti-inflammatory properties.
The dried curry leaves add vitamin K and small amounts of iron, while the dried onion and garlic flakes provide organosulfur compounds that support heart health.
Balanced Macronutrients
This complete meal offers a perfect balance of macronutrients: 35g protein from chicken, 20g healthy fats from coconut milk, and 45g complex carbs from the accompanying rice.
This combination helps stabilize blood sugar levels and keeps you satisfied for hours. The panko breading adds minimal carbs while providing that satisfying crunch.
Low-Calorie Comfort Food
Surprisingly, this indulgent-tasting dish clocks in at just 550 calories per serving when prepared with lean chicken and full-fat coconut milk. The crispy breading adds texture without significant calories, making it a guilt-free comfort food option.
The combination of protein and fiber helps promote satiety, reducing overall calorie intake throughout the day. ✨
Digestive Benefits
The potato starch used as a thickener acts as a prebiotic fiber, supporting gut health by feeding beneficial gut bacteria. The ginger often found in Japanese curry (which you can add if desired) aids digestion and reduces nausea.
The dish's balanced nutrition makes it gentle on the stomach while still being deeply satisfying.
Nutrition facts
Frequently asked questions
Can I substitute chicken breast with another protein?
Yes, but texture matters! Try pork cutlets (like tonkatsu) or salmon fillets for richer flavor. Avoid lean proteins like turkey breast—they dry out faster. For best results, maintain ¼-inch thickness and adjust cooking time by 1-2 minutes per side if using thicker cuts.
Why does my breading get soggy after frying?
The #1 mistake is keeping fried cutlets in hot oil too long—transfer immediately to a wire rack! Also, ensure your oil stays at 350°F (use a thermometer) and don't overcrowd the pan. For extra crispiness, double-fry: fry once, rest 5 minutes, then fry again for 1 minute.
Can I make this curry ahead of time?
The sauce reheats beautifully—simmer for 10-15 minutes until hot. For the chicken: fry fresh, then reheat in the oven at 350°F for 5-7 minutes (covered with foil) to maintain crispiness. Store components separately in airtight containers for up to 3 days.
What's the secret to the perfect curry roux?
Balance is key! Use 2 tbsp Japanese curry roux (or homemade blend) plus 1 tbsp Worcestershire sauce for umami. The starch (potato or corn) should be mixed with 2x its volume in water to prevent clumping. Simmer the sauce gently—rushing causes lumps and bitter flavors.
How do I serve this like a Japanese restaurant?
Pair with steamed Japanese short-grain rice and pickled vegetables (like beni shoga or takuan). Garnish with fresh parsley and a drizzle of toasted sesame oil**. Serve in a deep bowl with extra sauce on the side—Japanese curry is all about generous portions!